Rebuilding the little wizard of Solomon’s Key step by step with Phaser 4 and Arcade Physics
Do you remember Solomon’s Key? It was designed by Michitaka Tsuruta and released by Tecmo in arcades in July 1986, then on the NES in 1987 and on many home computers.
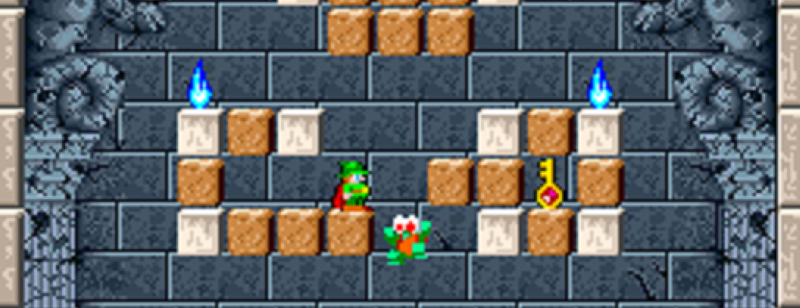
In this post, I am going to rebuild the gameplay of the little wizard of Solomon’s Key with Phaser 4 and Arcade Physics, in four steps.
I picked this game because the player edits the level while playing. Most platformer tutorials treat the tilemap as scenery that never changes, and here it changes every few seconds. Keeping Arcade Physics in agreement with a map that keeps changing is the real subject of this series.
Project setup
I started from the official Phaser 4 Vite TypeScript template, which already wires Vite, TypeScript and Phaser together with a development server and a production build.
I only reshaped it into a multi-page project: one folder per step, plus an index page that lists them.
steps/
    index.html          list of steps
    vite-env.d.ts
    01/
        index.html      page of the step
        main.ts         Phaser game configuration and start
        config.ts       game options
        levels.ts       tile codes, thing codes and level data
        scenes/
            Game.ts     the only scene
    02/ 03/ 04/
public/                 style.css, favicon.png
vite/config.dev.mjs
vite/config.prod.mjsEach file in a step has one job. config.ts holds every number worth tuning, so I never have to hunt for a speed or a color inside the scene. levels.ts holds the data, so the scene holds only logic.
One scene is enough for a single-screen game, since changing room just restarts it.
Both Vite configurations use steps as root and ../public as public folder. The production build finds the step folders by itself, so adding a step never means touching the configuration:
// the step list page plus every numbered step folder, so adding a step needs no config change
const input = Object.fromEntries([
    ['index', resolve('steps/index.html')],
    ...readdirSync('steps').filter((name) => /^\d+$/.test(name)).map((name) => [name, resolve('steps', name, 'index.html')])
]);Since every step is a full game, the quickest way to see what a step adds is to compare two folders, for instance diff -ru steps/03 steps/04.
Step 1: Level creation
This step draws the first room of the original game.
One decision made here shapes the whole series. The level will change at runtime, so I keep it in a single tilemap layer where every cell holds a tile, empty cells included.
It looks like an odd choice for a static room, and the reasons only show up in steps 2 and 3, but changing it later would mean rewriting every step.
What’s new:
- levels.ts: the
Tileenum and thelevel1array. - config.ts: tile size, map size, the color of each solid tile type and the color of the faces.
- main.ts: a game as big as the map, scaled to fit the window.
- Game.ts: one tilemap layer and
drawLevel.
Tile codes and level data
The room has three kinds of cell: empty, wall and block. Walls are the dark blue stone nothing can break.
Blocks are the orange ones the wizard will create and destroy from step 3 on. An enum gives each code a name, so the scene reads Tile.Wall instead of a bare 1.
/**
    * Map tile codes.
*/
export enum Tile {
    Empty = 0,

    /**
        * Solid tile nothing can destroy.
    */
    Wall = 1,

    /**
        * Solid tile the player will be able to create and destroy.
    */
    Block = 2
}The level is a plain two-dimensional array, one row of numbers per row of tiles. Tiles are square, so you can almost see the room in the numbers. These are its first eight rows:
export const level1: number[][] = [
    [1, 1, 1, 1, 1, 1, 1, 1, 1, 1, 1, 1, 1, 1, 1, 1],
    [1, 1, 1, 1, 1, 1, 1, 1, 1, 1, 1, 1, 1, 1, 1, 1],
    [1, 1, 1, 1, 1, 0, 0, 0, 0, 0, 1, 1, 1, 1, 1, 1],
    [1, 1, 1, 1, 2, 0, 0, 0, 0, 0, 2, 1, 1, 1, 1, 1],
    [1, 1, 1, 1, 2, 0, 0, 0, 0, 0, 2, 1, 1, 1, 1, 1],
    [1, 1, 1, 1, 1, 0, 0, 0, 0, 0, 1, 1, 1, 1, 1, 1],
    [1, 0, 0, 0, 1, 1, 1, 0, 2, 1, 1, 0, 0, 0, 1, 1],
[1, 0, 0, 0, 2, 0, 0, 2, 0, 0, 2, 0, 0, 0, 1, 1],Game size
The game size is not written anywhere: it comes from the tile size and the number of columns and rows, so it can’t disagree with the map. config.ts holds those three numbers, together with the colors used to draw the room.
export const GameOptions: Options = {
    tileSize: 32,
    columns: 16,
    rows: 14,
    tileColor: {
        [Tile.Wall]: 0x283278,
        [Tile.Block]: 0xff8800
    },
    faceColor: 0x5a78ff
};main.ts multiplies them to get the size of the game. Scale.FIT stretches the 512×448 canvas to the window keeping its proportions, and pixelArt keeps the edges sharp.
const config: Types.Core.GameConfig = {
    type: AUTO,
    width: GameOptions.tileSize * GameOptions.columns,
    height: GameOptions.tileSize * GameOptions.rows,
    parent: 'game-container',
    backgroundColor: '#000000',
    pixelArt: true,
    scale: {
        mode: Scale.FIT,
        autoCenter: Scale.CENTER_BOTH
    },
    scene: [
        Game
    ]
};One layer, every cell a tile
The whole level is one tilemap layer built from the array. Empty cells are 0, not -1, which is the value Phaser uses for a cell with no tile.
So every cell holds a tile, empty ones too. Nothing depends on this yet, but in step 3 it will let me turn an empty cell into a block just by changing its code.
The layer is created with an empty tileset array, createLayer(0, []), because there are no images, so it draws nothing by itself. setCollision marks walls and blocks as colliding.
The physics will need that in the next step, and it already tells me which tiles to draw.
create(): void {

    // tilemap built straight from the number array
    const mapConfig: Types.Tilemaps.TilemapConfig = {
        data: level1,
        tileWidth: GameOptions.tileSize,
        tileHeight: GameOptions.tileSize
    };

    // a layer with no tileset draws nothing by itself
    const map: Tilemaps.Tilemap = this.make.tilemap(mapConfig);
    this.layer = map.createLayer(0, []) as Tilemaps.TilemapLayer;
    this.layer.setCollision([Tile.Wall, Tile.Block]);

    this.graphics = this.add.graphics();
    this.drawLevel();
}Drawing the tiles myself
Phaser has a tilemap debug renderer, renderDebug, but it paints every colliding tile of a layer with the same color, and I want walls and blocks to look different.
Splitting the level into one layer per tile type would solve the colors, but tiles in different layers don’t know about each other, and step 2 shows what that costs.
Drawing a rectangle for each solid tile takes four lines, so I keep one layer and draw it on a Graphics object. Each tile knows its position in pixels, its size and its code, and the code picks the color from the configuration.
drawLevel(): void {

    // the debug renderer draws only faces: no fill for empty or solid tiles
    const styleConfig: Types.Tilemaps.StyleConfig = {
        tileColor: null,
        collidingTileColor: null,
        faceColor: Display.Color.IntegerToColor(GameOptions.faceColor)
    };

    this.graphics.clear();
    this.layer.filterTiles((tile: Tilemaps.Tile) => tile.collides).forEach((tile: Tilemaps.Tile) => {
        this.graphics.fillStyle(GameOptions.tileColor[tile.index]);
        this.graphics.fillRect(tile.pixelX, tile.pixelY, tile.width, tile.height);
    });
    this.layer.renderDebug(this.graphics, styleConfig);
}The debug renderer is still useful for something else.
Besides filling tiles, it outlines their “interesting” faces: the sides of a solid tile that touch an empty cell, which are the only sides Arcade Physics makes bodies land on or bump into.
With both fill colors set to null it only draws faces, and since it doesn’t clear the Graphics it receives, the blue lines land on top of my rectangles. A blue line on top of a tile means a body can stand there.
There is no line where a wall touches a block, because Phaser sees them as one solid mass.
clear does nothing useful yet, since the room is drawn once. In step 3 the room changes and gets drawn again.
Here is the result:
Nothing to do at the moment, let’s add the player.
Step 2: Player movement and jump
What’s new compared to step 1:
- levels.ts: a
Thingenum, aLevelObjecttype and aLevelinterface; the level becomes an object withtilesandobjects. - config.ts: gravity, player options and keys.
- main.ts: Arcade Physics with world gravity and
debug: true. - Game.ts: the player body, a collider with the layer, keyboard input.
Things are not tiles
I could add a PlayerStart code to the tile array, but a grid holds one code per cell, and later a key or a treasure will sit inside a block.
So I keep the tiles for the map and add a separate list of things, each one a type plus the column and the row of its tile.
export enum Thing {
    Player
}

export type LevelObject = [Thing, number, number];So far the first room lists only one thing, the tile where the wizard starts:
objects: [
    [Thing.Player, 2, 8]
]The body is half a tile wide, so he slips easily into one-tile gaps.
gravity: 760,
player: {
    width: 16,
    height: 28,
    speed: 90,
    jumpSpeed: 240
},
keys: {
    left: ['LEFT', 'A'],
    right: ['RIGHT', 'D'],
    jump: ['UP', 'W']
}Jump is on the up arrow, as on the NES pad, where the two buttons are kept for the spell and for fire.
The player body
The wizard is a bare Arcade body created with physics.add.body with no sprite and no texture, but only a rectangle the physics moves and the debug renderer outlines. It is centered horizontally in its tile and stands on the tile below.
setMaxVelocity caps the speed on both axes.
// the body is centered horizontally in its tile and stands on the tile below
const start: LevelObject = level1.objects.find((object: LevelObject) => object[0] === Thing.Player) as LevelObject;
const playerX: number = start[1] * tileSize + (tileSize - width) / 2;
const playerY: number = (start[2] + 1) * tileSize - height;
this.player = this.physics.add.body(playerX, playerY, width, height);

// the vertical cap equals the jump speed: jumps are untouched, falls get a terminal speed
this.player.setMaxVelocity(GameOptions.player.speed, GameOptions.player.jumpSpeed);
this.physics.add.collider(this.player, this.layer);This is where the single layer from step 1 pays off.
Arcade doesn’t collide with every side of every tile: Phaser marks as interesting only the faces that touch a non-colliding tile, so a body walking on a row of tiles never catches on the edges between them.
Phaser only compares tiles of the same layer, though. With walls and blocks in two layers, the top of a wall with a block on it would still count as a face to land on, and a body jumping into that corner would hang in mid-air. With one layer every face is computed right.
Moving and jumping
The horizontal velocity is set at every frame from the keys, with no acceleration, in the air too, since the original can be steered mid-jump. A jump starts only when the body stands on something, which Arcade reports with blocked.down, and always with the same speed, so every jump has the same height.
update(): void {

    // no acceleration: the player starts and stops at once, in the air too
    const velocityX: number = this.axis('left', 'right') * GameOptions.player.speed;
    this.player.setVelocityX(velocityX);

    // jumps only start from the ground, always with the same speed
    if (this.pressed('jump') && this.player.blocked.down) {
        this.player.setVelocityY(-GameOptions.player.jumpSpeed);
    }
}Reading the keyboard
Every action can have more than one key, arrows and WASD, so the scene reads actions, not keys. axis returns -1, 0 or 1, and 0 when both opposite keys are held, so the wizard doesn’t drift towards whichever key is checked first.
axis(negative: Action, positive: Action): number {
    return Number(this.held(positive)) - Number(this.held(negative));
}pressed tells whether an action has just started.
It uses filter rather than some on purpose: JustDown clears the flag of a key when it reads it, and some would stop at the first key, leaving the flag of the others set for a later jump nobody asked for.
pressed(action: Action): boolean {

    // filter, not some, so the flag of every key is consumed
    return this.keys[action].filter((key: Input.Keyboard.Key) => Input.Keyboard.JustDown(key)).length > 0;
}Look at the result:
Move with WASD or ARROW keys, UP to jump. You can’t spawn or destroy blocks at the moment, so let’s proceed to next step.
Step 3: Creating and destroying blocks
What’s new compared to step 2:
- levels.ts:
Tile.Cracked, a code that never appears in level data. - config.ts: the color of cracked blocks and two keys, crouch and magic.
- Game.ts:
facing,magic,headbuttandsetTile.
Changing a tile
Phaser can’t place new tiles in a layer that has no tileset. I don’t need it to: in step 1 empty cells became 0 instead of -1, so every cell already holds a tile. Creating a block means changing an empty tile’s code to Tile.Block and turning its collision on.
Destroying it is the reverse. Cracking it only changes the code, since a cracked block is still solid.
setCollision also updates the faces of the four neighbors, so walls and blocks keep colliding correctly whatever the wizard builds. Then the level is drawn again: drawLevel reads the code of every tile, so the new colors come for free, and the blue lines show at once how the ground around the block has changed.
setTile(tile: Tilemaps.Tile, type: Tile): void {

    // every cell already has a tile: changing its code and its collision is enough
    // phaser updates the faces of the neighbors by itself
    tile.index = type;
    tile.setCollision(type !== Tile.Empty);
    this.drawLevel();
}Which way the wizard faces
The spell targets the tile in front, so I need a direction even when the wizard stands still. It’s the last direction he walked, kept in facing.
// the last direction walked is the direction faced
const direction: number = this.axis('left', 'right');
const velocityX: number = direction * GameOptions.player.speed;
this.player.setVelocityX(velocityX);
if (direction !== 0) {
    this.facing = direction;
}The spell
The target is the tile in front of the body center, one row lower when crouching. I use the center rather than the feet because of what I saw in the emulator: casting during a jump hits the tile in front of the wizard at that height, not the one in front of where he took off. The center rises into the row above during a jump, and the spell follows it.
A block, cracked or not, goes away. Otherwise a new one appears, but only in an empty tile and only if no body is in it. I don’t loop over bodies for that: physics.overlapRect returns every body inside an area, and it will keep working when enemies arrive.
It also counts bodies that only touch the area, while the original lets the wizard create a block right against himself, so the area is 1 pixel smaller on each side.
magic(): void {

    // the tile in front of the body center, one row lower when crouching
    const tileSize: number = GameOptions.tileSize;
    const column: number = Math.floor(this.player.center.x / tileSize) + this.facing;
    const row: number = Math.floor(this.player.center.y / tileSize) + Number(this.held('crouch'));
    const tile: Tilemaps.Tile = this.layer.getTileAt(column, row);

    // blocks, cracked or not, go away
    if (tile.index === Tile.Block || tile.index === Tile.Cracked) {
        this.setTile(tile, Tile.Empty);
        return;
    }

    // a block appears only in an empty tile with no body in it
    // the area is 1 px smaller on each side, so a body only touching the tile does not count
    const cellX: number = tile.pixelX + 1;
    const cellY: number = tile.pixelY + 1;
    const cellSize: number = tileSize - 2;
    const bodies: Physics.Arcade.Body[] = this.physics.overlapRect(cellX, cellY, cellSize, cellSize) as Physics.Arcade.Body[];
    if (tile.index === Tile.Empty && bodies.length === 0) {
        this.setTile(tile, Tile.Block);
    }
}The first room is closed by walls on every side, so the target tile is always inside the map.
The headbutt
Arcade tells me when the head hits something: blocked.up is true in the frame the body is stopped from above.
It’s true for that frame only, because the hit sets the vertical speed to zero and gravity pulls the body down again. A check in update therefore runs once per hit, with no event to set up.
// the head hit a ceiling in this frame
if (this.player.blocked.up) {
    this.headbutt();
}headbutt looks at the tile just above the head, at the body center.
headbutt(): void {

    // the tile just above the head, at the body center
    const tileSize: number = GameOptions.tileSize;
    const column: number = Math.floor(this.player.center.x / tileSize);
    const row: number = Math.floor((this.player.top - 1) / tileSize);
    const tile: Tilemaps.Tile = this.layer.getTileAt(column, row);

    if (tile.index === Tile.Cracked) {
        this.setTile(tile, Tile.Empty);
    }
    else if (tile.index === Tile.Block) {
        this.setTile(tile, Tile.Cracked);
    }
}Look at the result:
Move with WASD or ARROW keys, UP to jump. SPACE to create or destroy a block.
Step 4: Key and door
What’s new compared to step 3:
- levels.ts:
Thing.KeyandThing.Door, and alevelsarray with three rooms in place oflevel1. - config.ts:
startLevel, the size of the key and door bodies and their colors. - Game.ts:
initreads the level to play, the key and the door with their overlaps,find,addThing, world bounds, and a guard for tiles outside the map.
Three rooms
The rooms are the first three of the original, with the starting point, the key and the door where the original puts them. Everything else is left out for now. Some things float: in the first room the key and the door are both one tile above the ground, so the wizard has to jump to reach them, as in the original.
objects: [
    [Thing.Player, 2, 8],
    [Thing.Key, 12, 7],
    [Thing.Door, 7, 10]
]One scene, restarted
The scene receives the level number through init, and moving to another room is scene.restart({ level }). Restarting throws away every body and the layer and builds the room from scratch. Blocks created or destroyed in the previous room are gone, because the tilemap is built again from the untouched level array.
init(data: { level?: number }): void {
    this.level = data.level ?? GameOptions.startLevel;
}Key and door
Key and door never move, so they are static bodies, created with physics.add.staticBody, and an overlap reacts when the wizard touches them.
An overlap, not a collider, because he goes through them.
addThing(type: Thing, color: number): Physics.Arcade.StaticBody {

    // size of the body and its distance from the tile edges
    const tileSize: number = GameOptions.tileSize;
    const size: number = GameOptions.thingSize;
    const offset: number = (tileSize - size) / 2;

    const thing: LevelObject = this.find(type);
    const thingX: number = thing[1] * tileSize + offset;
    const thingY: number = thing[2] * tileSize + offset;
    const body: Physics.Arcade.StaticBody = this.physics.add.staticBody(thingX, thingY, size, size);
    body.debugBodyColor = color;
    return body;
}Taking the key destroys its body and opens the door, and changing debugBodyColor is how I show it. The door is there from the start but lets the wizard out only when open; the modulo sends the last room back to the first.
// taking the key opens the door
const key: Physics.Arcade.StaticBody = this.addThing(Thing.Key, GameOptions.key.color);
this.physics.add.overlap(this.player, key, () => {
    key.destroy();
    this.doorOpen = true;
    this.door.debugBodyColor = GameOptions.door.openColor;
});

// the open door leads to the next level, the last one back to the first
this.doorOpen = false;
this.door = this.addThing(Thing.Door, GameOptions.door.closedColor);
this.physics.add.overlap(this.player, this.door, () => {
    if (this.doorOpen) {
        this.scene.restart({ level: this.level % levels.length + 1 });
    }
});No blocks on the key or the door
In the original the spell only works on empty tiles, so a block can’t be created on the key or the door. The spell already asks physics.overlapRect for the bodies in the target tile. It only returns moving bodies unless told otherwise, so two more arguments include static bodies, and the key and the door stop the spell the same way the wizard does.
const bodies: Physics.Arcade.Body[] = this.physics.overlapRect(cellX, cellY, cellSize, cellSize, true, true) as Physics.Arcade.Body[];Open rooms
The second room has no wall on its left side: the edge of the screen is the wall. setCollideWorldBounds turns the edges of the world into walls for the wizard, in one line.
// the screen edges are walls, since some rooms are open on one side
this.player.setCollideWorldBounds(true);The spell, though, can now aim at a tile outside the map, where getTileAt returns null. Both magic and headbutt stop when there is no tile.
const tile: Tilemaps.Tile | null = this.layer.getTileAt(column, row);

// nothing to do outside the map
if (tile === null) {
    return;
}And here’s the final prototype:
Move with WASD or ARROW keys, UP to jump. SPACE to create or destroy a block. Grab the key and reach the door.
What’s next
After four steps the wizard can solve the first rooms of the original: break out of the starting corner, climb with blocks, take the key and leave.
The pieces still missing all sit on top of what’s here. A time limit is a looping timer event. Walking enemies turn around when they meet a block, so the blocks the wizard creates become his only weapon. Mirrors that spawn enemies are timer events adding new bodies. Items hidden inside blocks appear when a block turns into an empty tile, and every change to a tile already goes through setTile.
Download the Vite project along with the full commented source code. Don’t know what I am talking about? There’s a free minibook to get you started, and a guide to Create Phaser Game app.