Creation of a complete Flash Tetris game
Talking about Tetris game, Actionscript 3, Flash and Game development.
If you did not already bought my book and want to see how in detail I am explaining every game, here it is the chapter covering Tetris, with some minor change to make it fit on the blog.
Tetris features shapes called tetrominoes, geometric shapes composed of four squared blocks connected orthogonally, that fall from the top of the playing field.
Once a tetromino touches the ground, it lands and cannot be moved anymore, being part of the ground itself, and a new tetromino falls from the top of the game field, usually a 10×20 tiles vertical rectangle.
The player can move the falling tetromino horizontally and rotate by 90 degrees to create a horizontal line of blocks.
When a line is created, it disappears and any block above the deleted line falls down. If the stacked tetrominoes reach the top of the game field, it’s game over.
DEFINING GAME DESIGN
There’s not that much to say about game design, since Tetris is a well known game and as you read this post you should be used to dealing with game design.
By the way, there is something really important about this game you need to know before you start reading this article: you won’t draw anything in the Flash IDE.
That is, you won’t manually draw tetrominoes, the game field, or any other graphic assets. Everything will be generated on the fly using AS3 drawing methods.
Tetris is the best game for starting learning how to draw with AS3 as it only features blocks, blocks, and only blocks.
Moreover, although the game won’t include advanced programming features, its principles make Tetris one of the hardest tile based puzzle games to code. Survive Tetris and you will have the skills to create more puzzle games focusing more on new features and techniques rather than on programming logic.
IMPORTING CLASSES AND DECLARING FIRST VARIABLES
The first thing we need to do, as usual, is set up the project and define the main class and function, as well as preparing the game field.
Create a new file (File | New) then from New Document window select Actionscript 3.0. Set its properties as width to 400 px, height to 480 px, background color to #333333 (a dark gray), and frame rate to 30 (quite useless anyway since there aren’t animations, but you can add an animated background on your own). Also, define the Document Class as Main and save the file as tetris.fla.
Without closing tetris.fla, create a new file and from New Document window select ActionScript 3.0 Class. Save this file as Main.as in the same path you saved tetris.fla. Then write:
package {
	import flash.display.Sprite;
	import flash.utils.Timer;
	import flash.events.TimerEvent;
	import flash.events.KeyboardEvent;
	public class Main extends Sprite {
		private const TS:uint=24;
		private var fieldArray:Array;
		private var fieldSprite:Sprite;
		public function Main() {
			// tetris!!
		}
	}
}
We already know we have to interact with the keyboard to move, drop, and rotate tetrominoes and we have to deal with timers to manage falling delay, so I already imported all needed libraries.
Then, there are some declarations to do:
private const TS:uint=24;
TS is the size, in pixels, of the tiles representing the game field. It’s a constant as it won’t change its value during the game, and its value is 24. With 20 rows of tiles, the height of the whole game field will be 24×20 = 480 pixels, as tall as the height of our movie.
private var fieldArray:Array;
fieldArray is the array that will numerically represent the game field.
private var fieldSprite:Sprite;
fieldSprite is the DisplayObject that will graphically render the game field.
Let’s use it to add some graphics.
DRAWING GAME FIELD BACKGROUND
Nobody wants to see an empty black field, so we are going to add some graphics. As said, during the making of this game we won’t use any drawn Movie Clip, so every graphic asset will be generated by pure ActionScript.
The idea: Draw a set of squares to represent the game field.
The development: Add this line to Main function:
public function Main() {
	generateField();
}
then write generateField function this way:
private function generateField():void {
	fieldArray=new Array  ;
	fieldSprite=new Sprite  ;
	addChild(fieldSprite);
	fieldSprite.graphics.lineStyle(0,0x000000);
	for (var i:uint=0; i<20; i++) {
		fieldArray[i]=new Array  ;
		for (var j:uint=0; j<10; j++) {
			fieldArray[i][j]=0;
			fieldSprite.graphics.beginFill(0x444444);
			fieldSprite.graphics.drawRect(TS*j,TS*i,TS,TS);
			fieldSprite.graphics.endFill();
		}
	}
}
Test the movie and you will see:

The 20x10 game field has been rendered on the stage in a lighter gray. I could have used constants to define values like 20 and 10, but I am leaving it to you at the end of the post.
Let's see what happened:
fieldArray = new Array();
fieldSprite=new Sprite();
addChild(fieldSprite);
These lines just construct fieldArray array and fieldSprite DisplayObject, then add it to stage as you have already seen a million times.
fieldSprite.graphics.lineStyle(0,0x000000);
This line introduces a new world called Graphics class. This class contains a set of methods that will allow you to draw vector shapes on Sprites.
lineStyle method sets a line style that you will use for your drawings. It accepts a big list of arguments, but at the moment we'll focus on the first two of them.
The first argument is the thickness of the line, in points. I set it to 0 because I wanted it as thin as a hairline, but valid values are 0 to 255.
The second argument is the hexadecimal color value of the line, in this case black.
Hexadecimal uses sixteen distinct symbols to represent numbers from 0 to 15. Numbers from zero to nine are represented with 0-9 just like the decimal numeral system, while values from ten to fifteen are represented by letters A-F. That's the way it is used in most common paint software and in the web to represent colors.
You can create hexadecimal numbers by preceding them with 0x.
Also notice that lineStyle method, like all Graphics class methods, isn't applied directly on the DisplayObject itself but as a method of the graphics property.
for (var i:uint=0; i<20; i++) { ... }
The remaining lines are made by the classical couple of for loops initializing fieldArray array in the same way you already initialized all other array-based games, and drawing the 200 (20x10) rectangles that will form the game field.
fieldSprite.graphics.beginFill(0x444444);
beginFill method is similar to lineStyle as it sets the fill color that you will use for your drawings. It accepts two arguments, the color of the fill (a dark gray in this case) and the opacity (alpha). Since I did not specify the alpha, it takes the default value of 1 (full opacity).
fieldSprite.graphics.drawRect(TS*j,TS*i,TS,TS);
With a line and a fill style, we are ready to draw some squares with drawRect method, that draws a rectangle. The four arguments represent respectively the x and y position relative to the registration point of the parent DisplayObject (fieldSprite, that happens to be currently on 0,0 in this case), the width and the height of the rectangle. All the values are to be intended in pixels.
fieldSprite.graphics.endFill();
endFill method applies a fill to everything you drew after you called beginFill method.
This way we are drawing a square with a TS pixels side for each for iteration. At the end of both loops, we'll have 200 squares on the stage, forming the game field.
DRAWING A BETTER GAME FIELD BACKGROUND
Tetris background game fields are often represented as a checkerboard, so let's try to obtain the same result.
The idea: Once we defined two different colors, we will paint even squares with one color, and odd squares with the other color.
The development: We have to modify the way generateField function renders the background:
private function generateField():void {
	var colors:Array=new Array("0x444444","0x555555");
	fieldArray=new Array  ;
	var fieldSprite:Sprite=new Sprite  ;
	addChild(fieldSprite);
	fieldSprite.graphics.lineStyle(0,0x000000);
	for (var i:uint=0; i<20; i++) {
		fieldArray[i]=new Array  ;
		for (var j:uint=0; j<10; j++) {
			fieldArray[i][j]=0;
			fieldSprite.graphics.beginFill(colors[j%2+i%2%2]);
			fieldSprite.graphics.drawRect(TS*j,TS*i,TS,TS);
			fieldSprite.graphics.endFill();
		}
	}
}
We can define an array of colors and play with modulo operator to fill the squares with alternate colors and make the game field look like a chessboard grid.
The core of the script lies in this line:
fieldSprite.graphics.beginFill(colors[(j%2+i%2)%2]);
that plays with modulo to draw a checkerboard.
Test the movie and you will see:

Now the game field looks better.
CREATING THE TETROMINOES
The concept behind the creation of representable tetrominoes is the hardest part of the making of this game. Unlike most tile based games that features actors of the same size, in Tetris every tetromino has its own width and height. Moreover, every tetromino except the square one is not symmetrical, so its size is going to change when the player rotates it.
How can we manage a tile-based game with tiles of different width and height?
The idea: Since tetrominoes are made by four squares connected orthogonally (that is, forming a right angle), we can split tetrominoes into a set of tiles and include them into an array.
The easiest way is to include each tetromino into a 4x4 array, although most of them would fit in smaller arrays, it's good to have a standard array.
Something like this:

Every tetromino has its own name based on the alphabet letter it reminds, and its own color, according to The Tetris Company (TTC), the company that currently owns the trademark of the game Tetris.
Just for your information, TTC sues every Tetris clone whose name somehow is similar to "Tetris", so if you are going to create and market a Tetris clone, you should call it something like "Crazy Bricks" rather than "Tetriz".
Anyway, following the previous picture, from left-to-right and from top-to-bottom, the "official" names and colors for tetrominoes are:
I - color: cyan (0x00FFFF)
T - color: purple (0xAA00FF)
L - color: orange (0xFFA500)
J - color: blue (0x0000FF)
Z - color: red (0xFF0000)
S - color: green (0x00FF00)
O - color: yellow (0xFFFF00)
The development: First, add two new class level variables:
private const TS:uint=24;
private var fieldArray:Array;
private var fieldSprite:Sprite;
private var tetrominoes:Array = new Array();
private var colors:Array=new Array();
tetrominoes array is the four-dimensional array containing all tetrominoes information, while colors array will store their colors.
Now add a new function call to Main function:
public function Main() {
	generateField();
	initTetrominoes();
}
initTetrominoes function will initialize tetrominoes-related arrays.
private function initTetrominoes():void {
	// I
	tetrominoes[0]=[[[0,0,0,0],[1,1,1,1],[0,0,0,0],[0,0,0,0]],[[0,1,0,0],[0,1,0,0],[0,1,0,0],[0,1,0,0]]];
	colors[0]=0x00FFFF;
	// T
	tetrominoes[1]=[[[0,0,0,0],[1,1,1,0],[0,1,0,0],[0,0,0,0]],[[0,1,0,0],[1,1,0,0],[0,1,0,0],[0,0,0,0]],[[0,1,0,0],[1,1,1,0],[0,0,0,0],[0,0,0,0]],[[0,1,0,0],[0,1,1,0],[0,1,0,0],[0,0,0,0]]];
	colors[1]=0x767676;
	// L
	tetrominoes[2]=[[[0,0,0,0],[1,1,1,0],[1,0,0,0],[0,0,0,0]],[[1,1,0,0],[0,1,0,0],[0,1,0,0],[0,0,0,0]],[[0,0,1,0],[1,1,1,0],[0,0,0,0],[0,0,0,0]],[[0,1,0,0],[0,1,0,0],[0,1,1,0],[0,0,0,0]]];
	colors[2]=0xFFA500;
	// J
	tetrominoes[3]=[[[1,0,0,0],[1,1,1,0],[0,0,0,0],[0,0,0,0]],[[0,1,1,0],[0,1,0,0],[0,1,0,0],[0,0,0,0]],[[0,0,0,0],[1,1,1,0],[0,0,1,0],[0,0,0,0]],[[0,1,0,0],[0,1,0,0],[1,1,0,0],[0,0,0,0]]];
	colors[3]=0x0000FF;
	// Z
	tetrominoes[4]=[[[0,0,0,0],[1,1,0,0],[0,1,1,0],[0,0,0,0]],[[0,0,1,0],[0,1,1,0],[0,1,0,0],[0,0,0,0]]];
	colors[4]=0xFF0000;
	// S
	tetrominoes[5]=[[[0,0,0,0],[0,1,1,0],[1,1,0,0],[0,0,0,0]],[[0,1,0,0],[0,1,1,0],[0,0,1,0],[0,0,0,0]]];
	colors[5]=0x00FF00;
	// O
	tetrominoes[6]=[[[0,1,1,0],[0,1,1,0],[0,0,0,0],[0,0,0,0]]];
	colors[6]=0xFFFF00;
}
colors array is easy to understand: it's just an array with the hexadecimal value of each tetromino color.
tetrominoes is a four-dimensional array. It's the first time you see such a complex array, but don't worry. It's no more difficult than the two-dimensional arrays you've been dealing with since the creation of Minesweeper. Tetrominoes are coded into the array this way:
tetrominoes[n] contains the arrays with all the information about the n-th tetromino. These arrays represent the various rotations, the four rows and the four columns.
tetrominoes[n][m] contains the arrays with all the information about the n-th tetromino in the m-th rotation. These arrays represent the four rows and the four columns.
tetrominoes[n][m][o] contains the array with the four elements of the n-th tetromino in the m-th rotation in the o-th row.
tetrominoes[n][m][o][p] is the p-th element of the array representing the o-th row in the m-th rotation of the n-th tetromino. Such element can be 0 if it's an empty space or 1 if it's part of the tetromino.
There isn't much more to explain as it's just a series of data entry. Let's add our first tetromino to the field.
PLACING YOUR FIRST TETROMINO
Tetrominoes always fall from the top-center of the level field, so this will be its starting position.
The idea: We need a DisplayObject to render the tetromino itself, and some variables to store which tetromino we have on stage, as well as its rotation and horizontal and vertical position.
The development: Add some new class level variables:
private const TS:uint=24;
private var fieldArray:Array;
private var fieldSprite:Sprite;
private var tetrominoes:Array = new Array();
private var colors:Array=new Array();
private var tetromino:Sprite;
private var currentTetromino:uint;
private var currentRotation:uint;
private var tRow:uint;
private var tCol:uint;
tetromino is the DisplayObject representing the tetromino itself.
currentTetromino is the number of the tetromino currently in game, and will range from 0 to 6.
currentRotation is the rotation of the tetromino and will range from 0 to 3 since a tetromino can have four distinct rotations, but for some tetrominoes such as "I", "S" and "Z" will range from 0 to 1 and it can be only 0 for the "O" one. It depends on how may distinct rotations a tetromino can have.
tRow and tCol will represent the current vertical and horizontal position of the tetromino in the game field.
Since the game starts with a tetromino in the game, let's add a new function call to Main function:
public function Main() {
	generateField();
	initTetrominoes();
	generateTetromino();
}
generateTetromino function will generate a random tetromino to be placed on the game field:
private function generateTetromino():void {
	currentTetromino=Math.floor(Math.random()*7);
	currentRotation=0;
	tRow=0;
	tCol=3;
	drawTetromino();
}
The function is very easy to understand: it generates a random integer number between 0 and 6 (the possible tetrominoes) and assigns it to currentTetromino. There is no need to generate a random starting rotation as in all Tetris versions I played, tetrominoes always start in the same position, so I assigned 0 to currentRotation, but feel free to add a random rotation if you want.
tRow (the starting row) is set to 0 to place the tetromino at the very top of the game field, and tCol is always 3 because tetrominoes are included in a 4 elements wide array, so to center it in a 10 column wide field, its origin must be at (10-4)/2 = 3.
Once the tetromino has been generated, drawTetromino function renders it on the screen.
private function drawTetromino():void {
var ct:uint=currentTetromino;
tetromino=new Sprite ;
addChild(tetromino);
tetromino.graphics.lineStyle(0,0x000000);
for (var i:int=0; i
Actually the first line has no sense, I only needed a variable with a name shorter than currentTetromino or the script wouldn't have fitted on the layout. That's why I created ct variable.
The rest of the script is quite easy to understand: first tetromino DisplayObject is constructed and added to Display List, then lineStyle method is called to prepare us to draw the tetromino.
This is the main loop:
for (var i:int=0; i
These two for loops scan through tetrominoes array elements relative to the current tetromino in the current rotation.
if (tetrominoes[ct][currentRotation][i][j]==1) {
/* ... */
}
This is how we apply the concept explained during the creation of tetrominoes array.
We are looking for the j-th element in the i-th row of the currentRotation-th rotation of the ct-th tetromino. If it's equal to 1, we must draw a tetromino tile.
These lines:
tetromino.graphics.beginFill(colors[ct]);
tetromino.graphics.drawRect(TS*j,TS*i,TS,TS);
tetromino.graphics.endFill();
just draw a square in the same way we used to do with the field background. The combination of all squares we drew will form the tetromino.
Finally, the tetromino is placed calling placeTetromino function that works this way:
private function placeTetromino():void {
tetromino.x=tCol*TS;
tetromino.y=tRow*TS;
}
It just places the tetromino in the correct place according to tCol and tRow values. You already know these values are respectively 3 and 0 at the beginning, but this function will be useful every time you need to update a tetromino's position.
Test the movie and you will see your first tetromino placed on the game field. Test it a few more times, to display all of your tetrominoes, and you should find a glitch.

While "O" tetromino is correctly placed on the top of the game field, "T" tetromino has shifted one row down.
This happens because some tetrominoes in some rotations have the first row empty. Since all tetrominoes are embedded in a 4x4 array, when the first row is empty it looks like the tetromino is starting from the second row of the game field rather than the first one.
We should scan for the first row of a newborn tetromino and set tRow to -1 rather than 0 if its first row is empty, to make it fall from the first game field row.
tRow cannot be an unsigned integer anymore as it can take a -1 value, so change the level class variables declarations:
private const TS:uint=24;
private var fieldArray:Array;
private var fieldSprite:Sprite;
private var tetrominoes:Array = new Array();
private var colors:Array=new Array();
private var tetromino:Sprite;
private var currentTetromino:uint;
private var currentRotation:uint;
private var tRow:int;
private var tCol:uint;
Then in generateTetromino function we must look for a 1 in the first row of the first rotation to make sure the current tetromino has a piece in the first row. If not, we have to set tRow to -1. Change generateTetromino function this way:
private function generateTetromino():void {
currentTetromino=Math.floor(Math.random()*7);
currentRotation=0;
tRow=0;
if (tetrominoes[currentTetromino][0][0].indexOf(1)==-1) {
tRow=-1;
}
tCol=3;
drawTetromino();
}
Then test the movie and finally every tetromino will start at the very top of the game field.

Tetrominoes won't float forever so it's time to add some interaction to the game.
MOVING TETROMINOES HORIZONTALLY
Players should be able to move tetrominoes horizontally with arrow keys (and any other keys you want to enable, but in this article we'll only cover arrow keys movement).
The idea: Pressing LEFT arrow key will make the current tetromino move to the left by one tile (if allowed) and pressing RIGHT arrow key will make the current tetromino move to the right by one tile (if allowed).
The development: The first thing which comes to mind is some tetrominoes in some rotations can have the leftmost column empty, just as it happened with the first row. For this reason, it's better to declare tCol variable as an integer since it can assume negative values when you next move the tetromino to the left edge of the game field.
private const TS:uint=24;
private var fieldArray:Array;
private var fieldSprite:Sprite;
private var tetrominoes:Array = new Array();
private var colors:Array=new Array();
private var tetromino:Sprite;
private var currentTetromino:uint;
private var currentRotation:uint;
private var tRow:int;
private var tCol:int;
Now you can add the keyboard listener to make the player move the pieces. It will be added on Main function:
public function Main() {
generateField();
initTetrominoes();
generateTetromino();
stage.addEventListener(KeyboardEvent.KEY_DOWN,onKDown);
}
onKDown function will handle the keys pressed in the same old way you already know. The core of this process is the call to another function called canFit that will tell us if a tetromino can fit in its new position.
private function onKDown(e:KeyboardEvent):void {
switch (e.keyCode) {
case 37 :
if (canFit(tRow,tCol-1)) {
tCol--;
placeTetromino();
}
break;
case 39 :
if (canFit(tRow,tCol+1)) {
tCol++;
placeTetromino();
}
break;
}
}
If we look at what happens when the player presses LEFT arrow key (case 37) we see tCol value is decreased by 1 and the tetromino is placed in its new position using placeTetromino function only if the value returned by canFit function is true.
Also, notice its arguments: the current row (tRow) and the current column decreased by 1 (tCol-1). It should be clear canFit function checks whether the tetromino can fit in a given position or not.
So when the player presses LEFT or RIGHT keys, we check if the tetromino would fit in the new given position, and if it fits we update its tCol value and draw it in the new position.
Now we are ready to write canFit function, that wants two integer arguments for the candidate row and column, and returns true if the current tetromino fits in these coordinates, or false if it does not fit.
private function canFit(row:int,col:int):Boolean {
var ct:uint=currentTetromino;
for (var i:int=0; i9) {
return false;
}
}
}
}
return true;
}
As seen, ct variable exists for a layout purpose.
In this function we have the classical couple of for loops and the if statement to check for current tetromino's pieces:
for (var i:int=0; i
and then the core of the function: checking for the tetromino to be completely inside the game field:
if (col+j<0) {
return false;
}
and
if (col+j>9) {
return false;
}
Once we found a tetromino piece at tetrominoes[ct][currentRotation][i][j], we know j is the column value inside the tetromino and col is the candidate column for the tetromino.
If the sum of col and j is a number outside the boundaries of game field, then at least a piece of the tetromino is outside the game field, and the position is not legal (return false) and nothing is done.
If all current tetromino's pieces are inside the game field, then the position is legal (return true) and the position of the tetromino is updated.
Look at this picture:
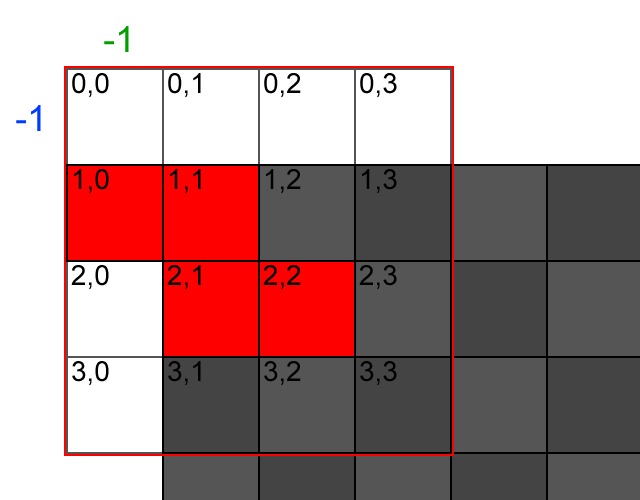
The "Z" tetromino is in an illegal position; let's see how we can spot it. The red frame indicates the tetromino's area, with black digits showing tetromino's array indexes.
The green digit represents the origin column value of the tetromino in the game field, while the blue one represents the origin row value.
When we check the tetromino piece at 1,0, we have to sum its column value (0) to the origin column value (-1). Since the result is less than zero, we can say the piece is in an illegal spot, so the entire tetromino can't be placed here.
All remaining tetromino's pieces are in legal places, because when you sum tetromino's pieces column values (1 or 2) with origin column value (-1), the result will always be greater than zero.
This concept will be applied to all game field sides.
Test the movie and you will be able to move tetrominoes horizontally.

Now, let's move on to vertical movement.
MOVING TETROMINOES DOWN
Moving tetrominoes down obviously applies the same concept to vertical direction.
The idea: Once the DOWN arrow key has been pressed, we should call canFit function passing as arguments the candidate row value (tRow+1 as the tetromino is moving one row down) and the current column value.
The development: Modify onKDown function adding the new case:
private function onKDown(e:KeyboardEvent):void {
switch (e.keyCode) {
case 37 :
/* ... */
break;
case 39 :
/* ... */
break;
case 40 :
if (canFit(tRow+1,tCol)) {
tRow++;
placeTetromino();
}
break;
}
}
We also need to update canFit function to check if the tetromino would go out of the bottom boundary.
Add this new if statement to canFit function:
private function canFit(row:int,col:int):Boolean {
var ct:uint=currentTetromino;
for (var i:int=0; i9) {
return false;
}
// out of bottom boundary
if (row+i>19) {
return false;
}
}
}
}
return true;
}
As you can see it's exactly the same concept applied to horizontal movement.
Test the movie and you will be able to move tetrominoes down.
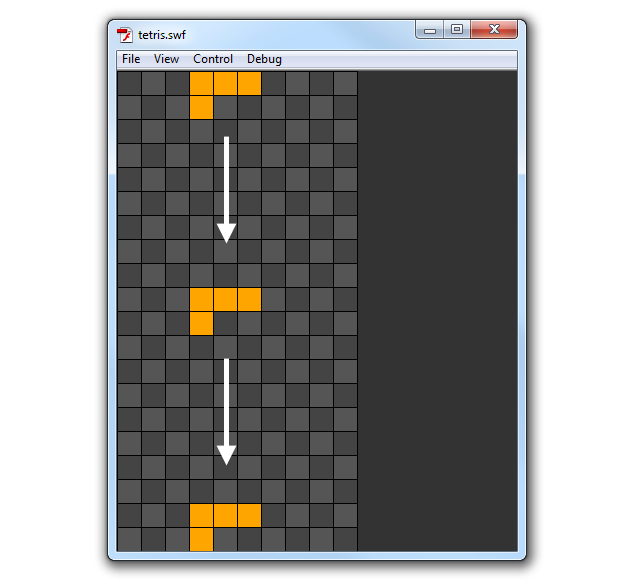
Everything is fine and easy at the moment, but you know once a tetromino touches the ground, it must stay in its position and a new tetromino should fall from the top of the field.
MANAGING TETROMINOES LANDING
The first thing to determine is: when should a tetromino be considered as landed? When it should move down but it can't. That's it. Easier than you supposed, I guess.
The idea: When it's time to move the tetromino down a row (case 40 in onKDown function), when you can't move it down (canFit function returns false), it's time to make it land and generate a new tetromino.
The development: Modify onKDown function this way:
private function onKDown(e:KeyboardEvent):void {
switch (e.keyCode) {
case 37 :
/* ... */
break;
case 39 :
/* ... */
break;
case 40 :
if (canFit(tRow+1,tCol)) {
tRow++;
placeTetromino();
} else {
landTetromino();
generateTetromino();
}
break;
}
}
When you can't move down a tetromino, landTetromino function is called to manage its landing and a new tetromino is generated with generateTetromino function.
This is landTetromino function:
private function landTetromino():void {
var ct:uint=currentTetromino;
var landed:Sprite;
for (var i:int=0; i
It works creating four new DisplayObjects, one for each tetromino's piece, and adding them to the Display List. At the same time, fieldArray array is updated.
Let's see this process in detail:
var ct:uint=currentTetromino;
This is the variable I created for layout purpose.
var landed:Sprite;
landed is the DisplayObject we'll use to render each tetromino piece.
for (var i:int=0; i
This is the loop to scan for pieces into the tetromino. Once it finds a piece, here comes the core of the function:
landed = new Sprite();
addChild(landed);
landed DisplayObject is added to Display List.
landed.graphics.lineStyle(0,0x000000);
landed.graphics.beginFill(colors[currentTetromino]);
landed.graphics.drawRect(TS*(tCol+j),TS*(tRow+i),TS,TS);
landed.graphics.endFill();
Draws a square where the tetromino piece should lie. It's very similar to what you've seen in drawTetromino function.
fieldArray[tRow+i][tCol+j]=1;
Updating fieldArray array setting the proper element to 1 (occupied).
removeChild(tetromino);
At the end of the function, the old tetromino is removed. A new one is about to come from the upper side of the game.
Test the movie and move down a tetromino until it reaches, then try to move it down again to see it land on the ground and a new tetromino appear from the top.
Everything will work fine until you try to make a tetromino fall over another tetromino.
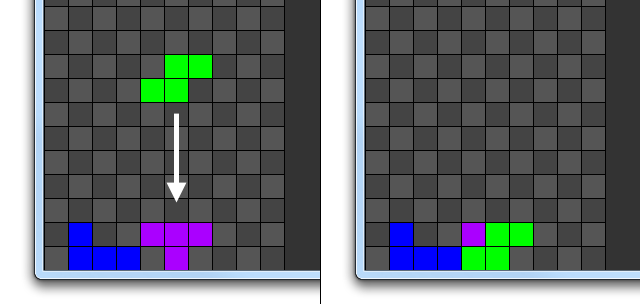
This happens because we haven't already managed the collision between the active tetromino and the landed ones.
MANAGING TETROMINOES COLLISIONS
Do you remember once a tetromino touches the ground we updated fieldArray array? Now the array contains the mapping of all game field cells occupied by a tetromino piece.
The idea: To check for a collision between tetrominoes we just need to add another if statement to canFit function to see if in the candidate position of the current tetromino there is a cell of the game field already occupied by a previously landed tetromino, that is the fieldArray array element is equal to 1.
The development: It's just necessary to add these three lines to canFit function:
private function canFit(row:int,col:int):Boolean {
var ct:uint=currentTetromino;
for (var i:int=0; i9) {
return false;
}
// out of bottom boundary
if (row+i>19) {
return false;
}
// over another tetromino
if (fieldArray[row+i][col+j]==1) {
return false;
}
}
}
}
return true;
}
Test the movie and see how tetrominoes stack correctly.
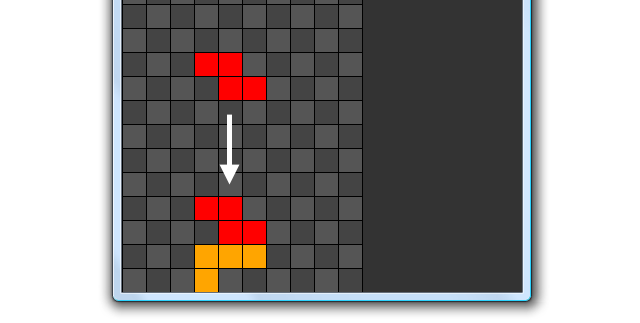
By the way, making lines is not easy if you can't rotate tetrominoes.
ROTATING TETROMINOES
The concept behind a tetromino rotation is not that different than the one behind its movement.
The idea: We have to see if the tetromino in the candidate rotation fits in the game field, and eventually apply the rotation.
The development: The first thing to do is to change canFit function to let it accept a third argument, the candidate rotation. Change it this way:
private function canFit(row:int,col:int,side:uint):Boolean {
var ct:uint=currentTetromino;
for (var i:int=0; i
As you can see there's nothing difficult in it: I just added a third argument called side that will contain the candidate rotation of the tetromino.
Then obviously any call to class level variable currentRotation has to be replaced with side argument.
Every existing call to canFit function in onKDown function must be updated passing the new argument, usually currentRotation, except when the player tries to rotate the tetromino (case 38):
private function onKDown(e:KeyboardEvent):void {
switch (e.keyCode) {
case 37 :
if (canFit(tRow,tCol-1,currentRotation)) {
/* ... */
}
break;
case 38 :
var ct:uint=currentRotation;
var rot:uint=ct+1%tetrominoes[currentTetromino].length;
if (canFit(tRow,tCol,rot)) {
currentRotation=rot;
removeChild(tetromino);
drawTetromino();
placeTetromino();
}
break;
case 39 :
if (canFit(tRow,tCol+1,currentRotation)) {
/* ... */
}
break;
case 40 :
if (canFit(tRow+1,tCol,currentRotation)) {
/* ... */
}
break;
}
}
Now let's see what happens when the player presses UP arrow key:
var ct:uint=currentRotation;
ct variable is used only for a layout purpose, to have currentRotation value in a variable with a shorter name.
var rot:uint=(ct+1)%tetrominoes[currentTetromino].length;
rot variable will take the value of the candidate rotation. It's determined by adding 1 to current rotation and applying a modulo with the number of possible rotations of the current tetromino, that's determined by tetrominoes[currentTetromino].length.
if (canFit(tRow,tCol,rot)) {
/* ... */
}
Calls canFit function passing the current row, the current column, and the candidate rotation as parameters. If canFit returns true, then these lines are executed:
currentRotation=rot;
currentRotation variable takes the value of the candidate rotation.
removeChild(tetromino);
The current tetromino is removed.
drawTetromino();
placeTetromino();
A new tetromino is created and placed on stage. You may wonder why I delete and redraw the tetromino rather than simply rotating the DisplayObject representing the current tetromino. That's because tetrominoes' rotations aren't symmetrical to their centers, as you can see looking at their array values.
Test the movie and press UP arrow key to rotate the current tetromino.
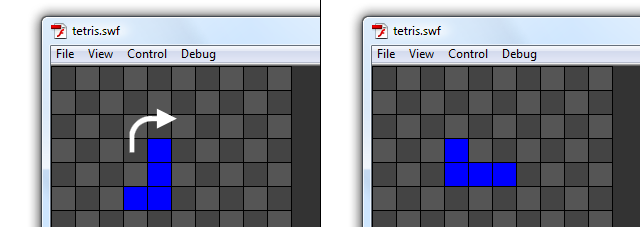
You will notice you can't rotate some tetrominoes when they are close to the first or last row or column. In some Tetris versions, when you try to rotate a tetromino next to game field edges, it's automatically shifted horizontally by one position (if possible) to let it rotate anyway.
In this prototype, I did not add this feature because there's nothing interesting from a programming point of view so I preferred to focus more in detail on other features rather than writing just a couple of lines about everything.
Anyway, if you want to try it by yourself, here's how it should work:
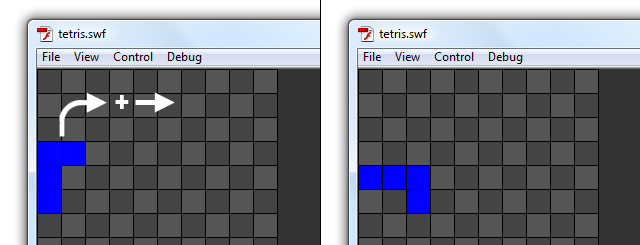
When a tetromino can't be rotated as one of its piece would go out of the game field, along with the rotation the tetromino is shifted in a safe area, if possible.
Finally, you can make lines! Let's see how to manage them.
REMOVING COMPLETED LINES
According to game mechanics, a line can be completed only after a tetromino is landed.
The idea: Once the falling tetromino lands on the ground or over another tetromino, we'll check if there is any completed line. A line is completed when it's entirely filled by tetrominoes pieces.
The development: At the end of landTetromino function you should check for completed lines and eventually remove them. Change landTetromino this way:
private function landTetromino():void {
var ct:uint=currentTetromino;
var landed:Sprite;
for (var i:int=0; i
As said, the last line calls checkForLines function that will check for completed lines. But before doing it, take a look at how I am giving a name to each piece of any landed tetromino. The name is meant to be easily recognizable by its row and column, so for instance the piece at the fifth column of the third row would be r3c5. Naming pieces this way will help us when it's time to remove them. We will be able to find them easily with the getChildByName method you should have already mastered.
Add checkForLines function:
private function checkForLines():void {
for (var i:int=0; i<20; i++) {
if (fieldArray[i].indexOf(0)==-1) {
for (var j:int=0; j<10; j++) {
fieldArray[i][j]=0;
removeChild(getChildByName("r"+i+"c"+j));
}
}
}
}
Test the movie and you will be able to remove complete lines.
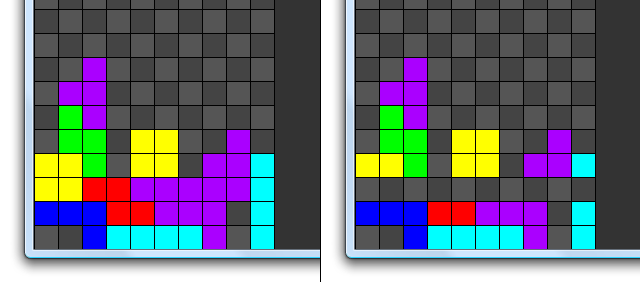
Let's see how checkForLines function works:
for (var i:int=0; i<20; i++) {
/* ... */
}
for loop iterating through all 20 lines in the game field
if (fieldArray[i].indexOf(0)==-1) {
/* ... */
}
Since a line must be completely filled with tetrominoes pieces to be considered as completed, the array must be filled by 1, that is, there can't be any 0. That's what this if statement is checking on the i-th line.
for (var j:int=0; j<10; j++) {
/* ... */
}
If a line is completed, then we iterate through all its ten columns to remove it.
fieldArray[i][j]=0;
This clears the game field bringing back fieldArray[i][j] element at 0.
removeChild(getChildByName("r"+i+"c"+j));
And this removes the corresponding DisplayObject, easily located by its name.
Now, we have to manage "floating" lines.
MANAGING REMAINING LINES
When a line is removed, probably there are some tetrominoes above it, just like in the previous picture. Obviously you can't leave the game field as is, but you have to make the above pieces fall down to fill the removed lines.
The idea: Check all pieces above the removed line and move them down to fill the gap left by the removed line.
The development: We can do it by simply moving down one tile, all tetrominoes pieces above the line we just deleted, and updating fieldArray array consequently.
Change checkForLines function this way:
private function checkForLines():void {
for (var i:int=0; i<20; i++) {
if (fieldArray[i].indexOf(0)==-1) {
for (var j:int=0; j<10; j++) {
fieldArray[i][j]=0;
removeChild(getChildByName("r"+i+"c"+j));
}
for (j=i; j>=0; j--) {
for (var k:int=0; k<10; k++) {
if (fieldArray[j][k]==1) {
fieldArray[j][k]=0;
fieldArray[j+1][k]=1;
getChildByName("r"+j+"c"+k).y+=TS;
getChildByName("r"+j+"c"+k).name="r"+j+1+"c"+k;
}
}
}
}
}
}
Let's see what we are going to do:
for (j=i; j>=0; j--) {
/* ... */
}
This is the most important loop. It ranges from i (the row we just cleared) back to zero. In other words, we are scanning all rows above the row we just cleared, including it.
for (var k:int=0; k<10; k++) {
/* ... */
}
This for loop iterates trough all 10 elements in the j-th row.
if (fieldArray[j][k]==1) {
/* ... */
}
Checks if there is a tetromino piece in the k-th column of the j-th row.
fieldArray[j][k]=0;
Sets the k-th column of the j-th row to 0.
fieldArray[j+1][k]=1;
Sets the k-th column of the (j+1)-th row to 1. This way we are shifting down an entire line.
getChildByName("r"+j+"c"+k).y+=TS;
Moves down the corresponding DisplayObject by TS pixels.
getChildByName("r"+j+"c"+k).name="r"+(j+1)+"c"+k;
Changes the corresponding DisplayObject name according to its new position.
Test the game and try to remove one or more lines. Everything will work properly.
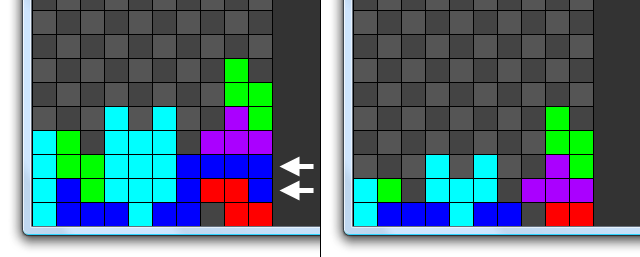
Now, to make the player's life harder, we can make tetrominoes fall down by themselves.
MAKING TETROMINOES FALL
One major feature still lacking in this prototype is the gravity that makes tetrominoes fall down at a given interval of time. With the main engine already developed and working, it's just a matter of adding a timer listener and doing the same thing as the player presses DOWN arrow key.
The idea: After a given amount of time, make the tetromino controlled by the player move down by one line.
The development: First, add a new class level variable.
private const TS:uint=24;
private var fieldArray:Array;
private var fieldSprite:Sprite;
private var tetrominoes:Array = new Array();
private var colors:Array=new Array();
private var tetromino:Sprite;
private var currentTetromino:uint;
private var currentRotation:uint;
private var tRow:int;
private var tCol:int;
private var timeCount:Timer=new Timer(500);
timeCount is the variable that will trigger the event listener every 500 milliseconds.
The timer listener will be added once a new tetromino is generated.
Modify generateTetromino function this way:
private function generateTetromino():void {
/* ... */
timeCount.addEventListener(TimerEvent.TIMER,onTime);
timeCount.start();
}
You already know how this listener works so this was easy, and writing onTime function will be even easier as it's just a copy/paste of the code to execute when the player presses DOWN arrow key (case 40).
private function onTime(e:TimerEvent):void {
if (canFit(tRow+1,tCol,currentRotation)) {
tRow++;
placeTetromino();
} else {
landTetromino();
generateTetromino();
}
}
The listener also needs to be removed once the tetromino lands, to let the script create a brand new one when a new tetromino is placed on the game field.
Remove it in landTetromino function this way:
private function landTetromino():void {
var ct:uint=currentTetromino;
var landed:Sprite;
for (var i:int=0; i
Test the movie, and tetrominoes will fall down one row every 500 milliseconds.
Now you have to think quickly, or you'll stack tetrominoes until you reach the top of the game field.
CHECKING FOR GAME OVER
Finally it's time to tell the player the game is over.
The idea: If the tetromino that just appeared on the top of the game field collides with tetrominoes pieces, the game is over.
The development: First we need a new class level variable:
private const TS:uint=24;
private var fieldArray:Array;
private var fieldSprite:Sprite;
private var tetrominoes:Array = new Array();
private var colors:Array=new Array();
private var tetromino:Sprite;
private var currentTetromino:uint;
private var currentRotation:uint;
private var tRow:int;
private var tCol:int;
private var timeCount:Timer=new Timer(500);
private var gameOver:Boolean=false;
gameOver variable will tell us if the game is over (true) or not (false). At the beginning obviously, the game is not over.
What should happen when the game is over? First, the player shouldn't be able to move the current tetromino, so change onKDown function this way:
private function onKDown(e:KeyboardEvent):void {
if (! gameOver) {
/* ... */
}
}
Then, no more tetrominoes should be generated. Change generateTetromino function this way:
private function generateTetromino():void {
if (! gameOver) {
currentTetromino=Math.floor(Math.random()*7);
currentRotation=0;
tRow=0;
if (tetrominoes[currentTetromino][0][0].indexOf(1)==-1) {
tRow=-1;
}
tCol=3;
drawTetromino();
if (canFit(tRow,tCol,currentRotation)) {
timeCount.addEventListener(TimerEvent.TIMER,onTime);
timeCount.start();
} else {
gameOver=true;
}
}
}
The first if statement:
if (! gameOver) {
/* ... */
}
executes the whole function only if gameOver variable is false.
Then the event listener is added only if canFit function applied to the tetromino in its starting position returns true. If not, this means the tetromino cannot fit even in its starting position, so the game is over, and gameOver variable is set to true.
Test the movie and try to stack tetrominoes until you reach the top of the game field, and the game will stop.
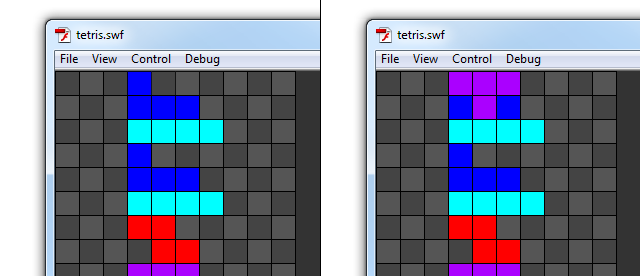
In the previous picture, when the "T" tetromino is added, it's game over.
Last but not least, we must show which tetromino will appear when the player lands the current one.
SHOWING NEXT TETROMINO
To add strategy to the game, we need to show the next tetromino that will fall after the current one has landed.
The idea: Don't random generate the current tetromino, but the next one. When the current tetromino lands, you already know which tetromino will fall from the top because the next tetromino becomes the current one, and you will generate a new random next tetromino.
The development: We need a new class level variable where the value of the next falling tetromino is stored.
private const TS:uint=24;
private var fieldArray:Array;
private var fieldSprite:Sprite;
private var tetrominoes:Array = new Array();
private var colors:Array=new Array();
private var tetromino:Sprite;
private var currentTetromino:uint;
private var nextTetromino:uint;
private var currentRotation:uint;
private var tRow:int;
private var tCol:int;
private var timeCount:Timer=new Timer(500);
private var gameOver:Boolean=false;
At this point, the logic is to generate the random value of the next tetromino first, even before generating the current one. Moreover, forget completely the current tetromino generation. Change Main function to generate the next tetromino this way:
public function Main() {
generateField();
initTetrominoes();
nextTetromino=Math.floor(Math.random()*7);
generateTetromino();
stage.addEventListener(KeyboardEvent.KEY_DOWN,onKDown);
}
And the trick is done. Now when it's time to generate the current tetromino, assign it the value of the next one and generate the next random tetromino this way:
private function generateTetromino():void {
if (! gameOver) {
currentTetromino=nextTetromino;
nextTetromino=Math.floor(Math.random()*7);
drawNext();
// ...
}
}
As you can see, you are only randomly generating the next tetromino, while the current one only takes its value.
drawNext function just draws the next tetromino in the same way drawTetromino does, just in another place.
private function drawNext():void {
if (getChildByName("next")!=null) {
removeChild(getChildByName("next"));
}
var next_t:Sprite=new Sprite ;
next_t.x=300;
next_t.name="next";
addChild(next_t);
next_t.graphics.lineStyle(0,0x000000);
for (var i:int=0; i
Test the movie, and here it is, your next tetromino.
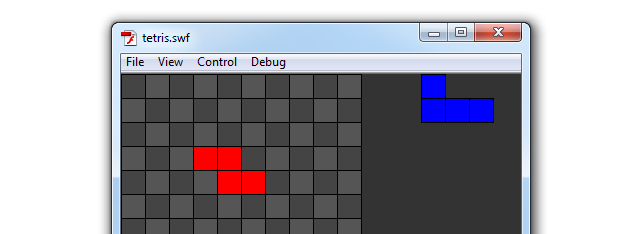
Now you can play the fully functional Tetris prototype.
SUMMARY
You went through the creation of a complete Tetris game, and this alone would be enough. Moreover, you also managed to draw basic shapes with AS3.
Where to go now
To improve your skills, you could clean the code a bit, using constants where required. This is not mandatory, but using FIELD_WIDTH and FIELD_HEIGHT rather than 10 and 20 here and there could improve code readability. It would also be nice if you decrease the timer that controls tetrominoes' falling speed every, let's say, ten completed lines.
You can create two new class level variables called completedLines (starting at zero and increasing every time the player completes a line) and fallingTimer (to be set at 500 and used rather than new Timer(500)).
Then every time completedLines is a multiple of ten (use modulo), stop the timer using stop method just like you made it start with start method, remove the listener, decrease fallingTimer by, let's say, 25, and create and start a new timer with a new listener.
And that's it. I hope you enjoyed the making of Tetris and you will buy my book. It would be a great support for the blog.
Never miss an update! Subscribe, and I will bother you by email only when a new game or full source code comes out.

