

Step by step guide to create Android native games in HTML5 with Cocoon.io and without Android Studio
Talking about Android, HTML5 and Javascript.
Learn cross platform HTML5 game development
Check my Gumroad page for commented source code, games and books.
index.html page look something like this:
<!DOCTYPE html>
<html>
	<head>
        <title>ZNUMBERZ</title>
        <meta name = "viewport" content = "width = device-width, initial-scale = 1.0, maximum-scale = 1.0, minimum-scale = 1.0, user-scalable = 0, minimal-ui" />
        <link rel = "shortcut icon" sizes = "256x256" href = "icon-256.png" />
        <style type = "text/css">
            * {
                padding: 0;
                margin: 0;
            }
            body{
                background: #202020;
            }
            canvas {
                touch-action-delay: none;
                touch-action: none;
                -ms-touch-action: none;
            }
        </style>
        <script src="cordova.js"></script>
        <script src="phaser.min.js"></script>
        <script src = "game.js"></script>
	</head>
	<body>
	</body>
</html>
document.addEventListener("deviceready", onDeviceReady, false);

function onDeviceReady(){
    // your game here
}
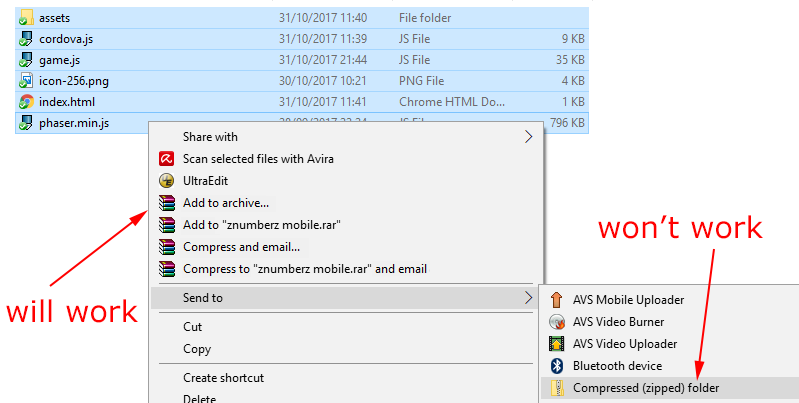 If you have a Mac, you can use your default macOS zip utility.
6 – Download Java JDK
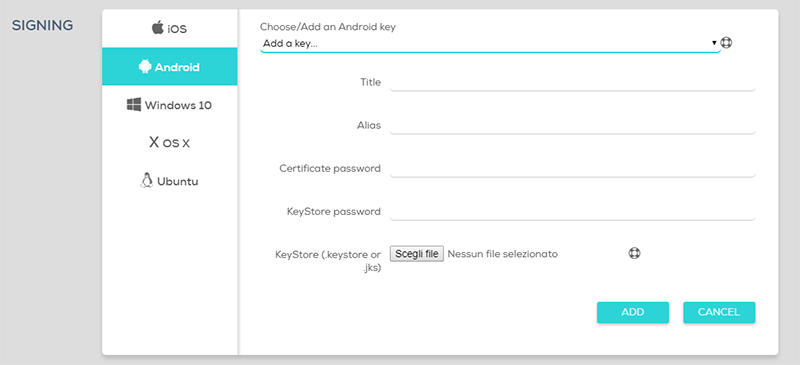
You will need it to create your keystores, required by Cocoon.io to compile your game. You can download it from this page.
7 – Create your keystores
You are going to use keytool to generate your release or debug keystore.
Execute the command prompt as administrator, move into your
If you have a Mac, you can use your default macOS zip utility.
6 – Download Java JDK
You will need it to create your keystores, required by Cocoon.io to compile your game. You can download it from this page.
7 – Create your keystores
You are going to use keytool to generate your release or debug keystore.
Execute the command prompt as administrator, move into your bin directory into your Java/jdk directory then write
keytool -genkey -v -keystore my-key.keystore -alias alias_name -keyalg RSA -keysize 2048 -validity 10000
for your release keystore, or
keytool -genkey -v -keystore debug.keystore -storepass android -alias androiddebugkey -keypass android -keyalg RSA -keysize 2048 -validity 10000
for your debug keystore.
8 – Compile signing section
At this time you are readyto upload the keystore along with its passwords
 Now, you can compile your Android native app, directly on Cocoon cloud
 Never miss an update! Subscribe, and I will bother you by email only when a new game or full source code comes out.