Learn AS3 by following this simple avoider game tutorial
The blogsphere is magic. When you start a blog, if you do a good job, some people inspired by you will start blogging, and probably inspire you.
This is the case of Michael Williams, who said I was one of the main reasons he decided to make a blog about Flash game development.
He wrote an excellent 4 steps tutorial about making a game with AS3 and gave me the permission to publish it to give it more exposure.
I am publishing the first part, encouraging you to visit his blog for more updates.
Introduction
A lot of Flash developers find the jump from ActionScript 2 to ActionScript 3 very daunting. Conversely, a lot of programmers of other languages find ActionScript 3 quite intuitive, but hate ActionScript 2! This tutorial is aimed at anyone that has some programming experience. You don’t have to know AS2, or even have used Flash before, but you’ll need to know the basics of some language. So long as you understand variables, if statements, loops, and functions, you’ll be fine. I will be pointing out some of the major differences between AS2 and AS3 for the benefit of those Flash developers making the switch, but I’m not going to focus on the changes.
The subject of this tutorial? Frozen Haddock has been kind enough to let me rewrite his ActionScript 2 Avoiding Game Tutorial in ActionScript 3. Thanks, Frozen Haddock! This is not a direct port of his tutorial, however. I’ll be redesigning the code to follow good AS3 practices, which means:
- One frame
- One layer
- No items on the Stage
- No code in the timeline
- No code in any symbols
(If you’ve never used Flash to create a game before, the above will probably mean nothing to you. Trust me, that’s a good thing!)
These rules might have to be bent a little when it comes to adding a preloader. We’ll cross that bridge when we come to it.
We’ll also be using classes and events and OOP and all sorts of nice programmer things. But I’m getting ahead of myself. In this part of the tutorial, we’ll just be setting everything up and putting in some very basic game mechanics.
Setup
Let’s start off simple. Boot up your copy of Adobe Flash CS3 (or later, if you’re reading this from the future) and select File > New > Flash File (ActionScript 3.0).
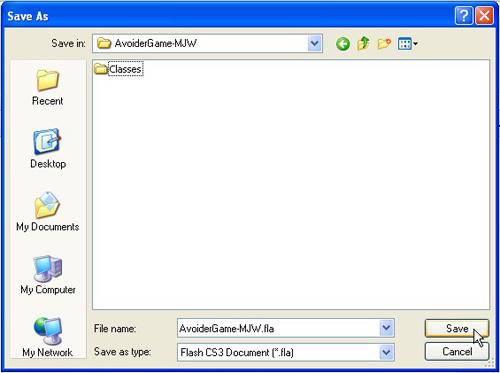
Click File > Save and create a new folder somewhere where you can store all the game’s files. I recommend using your name or initials in the folder’s name as this will make it easier to share with other people later. For reference, I’m calling mine AvoiderGame-MJW. Create a new folder, inside this folder, called Classes. Finally, enter a name for your FLA file (I used AvoiderGame-MJW.fla) and save it in the main folder, not the Classes one.
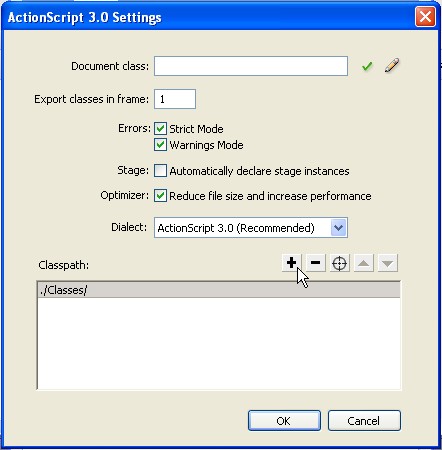
There are some default settings we need to alter before we can start on the game proper. Click File > Publish Settings. Click the Flash tab, if it’s not already selected, then click the Settings button next to the ActionScript Version drop-down list:

Click the little plus icon above the Classpaths box, and type ./Classes/ in the textbox that appears. This tells Flash that we are going to store the code that we write in the Classes folder we made earlier, so it should check in there if it can’t find any code that it needs.
Next we’ll alter the properties of the game itself. Click Modify > Document and set it up however you like. Frozen Haddock gave his a size of 300 by 300 pixels, and a grey background. I’ve stuck with the grey, but gone for the oldschool-TV-ratio dimensions of 400 by 300 pixels. You can always change this later, so don’t fret too much over it. I do recommend sticking with a frame rate of 24 fps, though. Here’s what I did:

OK, that’s the dull setup out of the way. Let’s create our enemy!
Creating the Enemy
The enemy is the object that you, as a player, will have to avoid (hence, Avoider Game). Let’s draw it before giving it life. Click Insert > New Symbol and in the box that appears, give it a Name of Enemy (with a capital E!) and a Type of Movie Clip (in case we want to animate it later). Click OK. The Library will now show your new Enemy object:

If you can’t see a Library, make sure Window > Library is checked. By default you will be automatically editing the Enemy. You can tell what you’re editing by the bar over the editing window:

If you’re not editing the Enemy for some reason, just double-click it in the Library (or right-click it and select Edit). Draw your Enemy. Frozen Haddock picked a smiley face for his bad guy. Who knows why? Maybe it’s got something to do with those blasted banner adverts. I’m going to do the same. You can make anything you want, but I’m going to assume that we’re all using a roughly circular Enemy, so bear in mind that if you draw a stickman, some parts of this tutorial won’t apply to you. Also, if you’re not used to the Flash drawing environment, it can be a little unintuitive. I recommend this quick drawing tutorial if that applies to you. Here’s my guy:
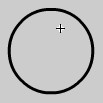


Pretty awesome. There’s a bit of a problem though. You see that little black crosshair with the white background? That’s called the registration point, and when we start writing code to say, “put the Enemy at such-and-such a position”, it’s this point that Flash is going to actually place at that position. (It’s hard to explain in words; later on this will become much clearer.) For this reason, I’m going to move the face around so that the registration point is dead centre. Here’s how to do it:
First, make sure you’re editing your Enemy, and then select everything (click Edit > Select All). A crosshatch pattern will appear:

Now, group everything together by clicking Modify > Group Together. A blue box will appear. If you now click and drag anything inside that box, the entire enemy will move as one. (If you had tried this before, you would have ended up dragging his eye out.)

Go to the Align panel. If you can’t see it, make sure Window > Align is checked. With the Enemy still selected (i.e., with the blue box still around it), make sure the To stage button is in, and click the two central Align buttons:

Now that we’ve finished with the Enemy’s design, we can get out of editing mode. Click Scene 1 on the bar above the editing box. This would be a great time to save our work, so hit File > Save.
The Enemy’s Instructions
So far, nothing we’ve done has been significantly different from what we would have done in any previous version of Flash. That’s about to change. It’s time to start writing code to control the Enemy’s behaviour. As I mentioned at the start, this code is not going to go in either the timeline or the Actions of the Enemy symbol. Instead, it’s going to be kept in an external file. There are a number of benefits to this:
- The code is completely separate from the artwork, so you can give your artist the FLA file without having to give them the source code.
- Likewise, you can give a programmer parts of the code without having to send them all your artwork and sounds – or even the rest of the code.
- If you have a number of programmers each working on separate parts of the code, it’s much easier to put it all back together later
Click File > New and select ActionScript File. A blank text-editing window will appear. Immediately save the file, as Enemy.as, in the Classes folder you created earlier. This file is going to contain the class – a programming template – for our antagonistic smiley faces.
It’s around this point in an AS3 tutorial that most AS2 programmers start to complain about how much harder it is to use AS3, because there’s so much more that has to be written just to get an object to do something. Please bear with me, and you will see that, although there are indeed more lines of code needed to set this up, they aren’t very difficult to understand, and the approach we take in writing them will really pay off in the long run.
Begin by typing the following:
package {
}
The package keyword simply says that everything between the next pair of curly braces is part of a single… well, package. In this case, everything in this package concerns the Enemy object.
As part of this package (so, between the curly brackets), we need to define the Enemy’s class; the template that specifies what it can do, and what we can do with it:
package {
	public class Enemy extends MovieClip {

	}
}
Let’s examine this bit by bit:
class Enemy: “everything between the next pair of curly brackets makes up the Enemy class.”
public: “this class can be accessed by any other piece of code that knows about it.” The alternative would be internal, meaning that only code inside the same package could access this class.
extends MovieClip: “I can do anything a MovieClip class can do – and more besides.” So, for example, since we can write code that makes a MovieClip move to the next frame of its animation, we can do the same with an Enemy (or at least we could, if it contained more than one frame). On top of that, we can give this Enemy an HP count (say) which a MovieClip doesn’t have, thus extending the functionality.
The thing is, even though MovieClip is such an important and frequently-used class of object, Flash still has to be told where it is. So, we write in line 2, below:
package {
	import flash.display.MovieClip;
	public class Enemy extends MovieClip {

	}
}
Finally, the Enemy class needs what’s known as a constructor function. This is just a function that runs whenever a new Enemy is created. All constructor functions must have the same name as the class they belong to, so:
package {
	import flash.display.MovieClip;
	public class Enemy extends MovieClip {
		public function Enemy() {
		}
	}
}
There’s that word public again. Note that the Enemy function has an empty pair of parenthesis directly after it; more on that later.
So now we have our Enemy class set up, we need to link it to our Enemy graphic. Save the AS file and go back to the FLA file (it’ll be on the tab bar at the top of the window, or in the Window menu, assuming you haven’t closed it). Right click the Enemy in the Library, and select Linkage. Check the Export for ActionScript box, and make sure that the Class reads “Enemy”. If everything’s linked up fine, then clicking the little pencil icon should open up the Enemy class that we were just working on.

Click OK to close the Linkage box.
Now we need to code in the Enemy’s actual behaviour. What does it need to do? At this point, all we need it to do is:
- Appear above the top of the screen when it’s created
- Keep moving downward from that time onward
We already have a space to put code that needs to execute upon the creation of the Enemy – the constructor function. So:
package {
	import flash.display.MovieClip;
	public class Enemy extends MovieClip {
		public function Enemy() {
			x=100;
			y=0;
		}
	}
}
Since MovieClips have x and y properties, so does our Enemy class.
Those of you familiar with Cartesian coordinates are probably saying, “whoa, Michael! I thought we wanted the Enemy to appear at the top of the screen, but you’ve set the y-coordinate to zero, which is surely the bottom.” I’m afraid that Flash is weird in that respect: y increases as you go *down* the screen. For my 400 by 300 pixel stage, the coordinates look like this:

You get used to it.
I’m going to handle the movement by having something else tell the Enemy to move downward, just a little bit, every split-second. We need to add this movement functionality to the Enemy class, since MovieClips don’t already have something that can do that, so let’s create a new function:
package {
	import flash.display.MovieClip;
	public class Enemy extends MovieClip {
		public function Enemy() {
			x=100;
			y=0;
		}
		public function moveDownABit():void {
			y=y+3;
		}
	}
}
Let’s break this down again:
function moveDownABit(): everything between the following pair of curly brackets makes up a function called *moveDownABit*. Again, we have that empty pair of parenthesis after the function name.
public: another part of the game is going to actually run this function, so it needs to be public.
:void: this function does not return any feedback. Don’t dwell on this; I’ll explain it when we make a function that does return something.
y=y+3;: increase the y-coordinate of the Enemy by 3 pixels (remember, this will move the enemy downwards, not upwards).
Making an Enemy
Save your Enemy.as file and go back to the FLA file. Our next step is to get an actual enemy into the game; up till now we’ve just been dealing with a template of an Enemy, not an actual enemy itself. It’s like we’ve been working on a blueprint, and now we need to use that blueprint to build an actual, physical house.
It’s important to remember that Flash started off as a tool for creating animating movies. Even though it’s developed a lot since then, Flash still considers everything you create with it to be a MovieClip. As we know, MovieClips have a constructor function that runs when they’re created, and therefore so does your game. We’re going to extend this function to make it create an Enemy within the game when the game is started. But how do we access the game’s constructor? If you said, “another AS file,” you’re correct.
Create a new AS file, and save it in the Classes folder with the name AvoiderGame.as. Add these lines to the file, and save it:
package {
	import flash.display.MovieClip;
	public class AvoiderGame extends MovieClip {
		public function AvoiderGame() {
		}
	}
}
Look familiar? Apart from the names of the class and the constructor, it’s exactly the same as our Enemy AS file started out. Let’s link it to our FLA file.
Move back to the FLA file and make sure you’re not still editing the Enemy. Find the Properties panel – if you can’t see it, make sure Window > Properties > Properties is checked. There’s a box marked Document class; enter AvoiderGame. It’s important to use capital letters in the right places here – since we’ve called the file AvoiderGame.as and the class within the file AvoiderGame, we have to follow suit with the name of the document class. Clicking the little pencil icon should bring up the AvoiderGame class file.

Great, so now we can edit the actual game’s constructor to make it create an enemy at startup:
package {
	import flash.display.MovieClip;
	public class AvoiderGame extends MovieClip {
		public function AvoiderGame() {
			enemy=new Enemy();
		}
	}
}
Watch your capitalisation here! Enemy with a capital E is the class file that defines features common to all Enemies. enemy with a small e is a specific example – an “instance” – of an Enemy. It’s like, Person is a class, but I am an instance of that class.
At the minute, this instance enemy of Enemy is only available to the constructor function as it is first referred to within that function. We need it to be available throughout the entire game, so add this line of code (line 4):
package {
	import flash.display.MovieClip;
	public class AvoiderGame extends MovieClip {
		public var enemy:Enemy;
		public function AvoiderGame() {
			enemy=new Enemy();
		}
	}
}
public: you know what this means.
var: “the following is a new *var*iable that I am defining.”
enemy:Enemy: “the variable is called enemy, and it is an instance of the Enemy class.”
Since the enemy variable is defined within the AvoiderGame class, it’ll be available throughout the class.
So now we’ve created an enemy, but it’s just sort of floating about in the aether. We need to tie it down to the actual game:
		public function AvoiderGame() {
			enemy=new Enemy();
			addChild(enemy);
		}
addChild(enemy): “enemy belongs to (is a child of) this AvoiderGame.”
At last, we can run the game and expect some results! Save everything, then hit Control > Test Movie. You’ll get something like this:

Hooray! Only… we want all of the enemy to start above the window, not just half of it. What Flash has done is position the enemy so that its registration point is positioned at the point (100,0). We could move the registration point to the bottom of the enemy, but I think that’s a sloppy solution. Instead, let’s just change the enemy’s starting y-position; alter the constructor in the Enemy.as file like so:
		public function Enemy() {
			x=100;
			y=-30;
		}
You’ll need to alter that y-value depending on the height of your Enemy.
Bringing the Enemy to Life
Although we’ve built in some functionality to let the enemy move downwards, we haven’t written any code that actually tells the enemy to do so. Let’s do that next.
The basic idea, as I outlined above, is to have the game tell the enemy to move a few pixels down every split-second. Frozen Haddock’s tutorial used a couple of neat methods for achieving this, but we don’t need to use either of those, because AS3 has a new solution: the Timer class that does it all for us.
Edit the game’s constructor function to create a new instance, gameTimer, of the Timer class. This is a built-in class, so you don’t need to create a new AS file; just edit AvoiderGame.as this way:
		public function AvoiderGame() {
			enemy=new Enemy();
			addChild(enemy);

			gameTimer = new Timer(25);
		}
Note that this time the parenthesis after the class name are not empty. That number 25 says that we want to set the interval of the timer to 25ms (milliseconds; 1000ms = 1 second), i.e., we want it to do something every 25ms.
We want this gameTimer to last throughout the game, of course, so we need to make it available to the entire class (line 5):
package {
	import flash.display.MovieClip;
	public class AvoiderGame extends MovieClip {
		public var enemy:Enemy;
		public var gameTimer:Timer;

		public function AvoiderGame() {
			enemy=new Enemy();
			addChild(enemy);

			gameTimer = new Timer(25);
		}
	}
}
…and Timer is like MovieClip, in that Flash has to be told about it before we can use it (line 3):
package {
	import flash.display.MovieClip;
	import flash.utils.Timer;

	public class AvoiderGame extends MovieClip {
		public var enemy:Enemy;
		public var gameTimer:Timer;

		public function AvoiderGame() {
			enemy=new Enemy();
			addChild(enemy);

			gameTimer = new Timer(25);
		}
	}
}
(By the way, don’t worry about how I know that it’s
flash.utils.Timer and flash.display.MovieClip; I looked it up.)
All right, so we have a Timer that goes off every 25ms. But at the minute it’s not connected to anything; it’s not telling the enemy to move down the screen. So, add the following (line 14) to your game’s constructor:
		public function AvoiderGame() {
			enemy=new Enemy();
			addChild(enemy);

			gameTimer = new Timer(25);
			gameTimer.addEventListener(TimerEvent.TIMER, moveEnemy);
		}
gameTimer.addEventListener: “apply an event listener to the gameTimer with the following parameters.” An event listener is like a robot that’s constantly checking to see if a particular “event” has occurred, and which runs another function if so. In this case, the event is…
TimerEvent.TIMER: this event goes off every time a Timer completes an interval; in our case, this event will be triggered every 25ms, because that is the interval of the gameTimer.
moveEnemy: this is the function that’s going to be run every time the TimerEvent occurs. We haven’t written this function yet; we’ll get to that in a minute.
TimerEvent is yet another thing that Flash has to be told about, so import it at the top (line 4):
package {
	import flash.display.MovieClip;
	import flash.utils.Timer;
	import flash.events.TimerEvent;
Now we need to write that moveEnemy function that’ll actually be run every 25ms (lines 18 & 19):
	public class AvoiderGame extends MovieClip {
		public var enemy:Enemy;
		public var gameTimer:Timer;

		public function AvoiderGame() {
			enemy=new Enemy();
			addChild(enemy);

			gameTimer = new Timer(25);
			gameTimer.addEventListener(TimerEvent.TIMER, moveEnemy);
		}

		public function moveEnemy(event:TimerEvent):void {
		}
	}
Again, we’ve got something inside the parenthesis. This allows the event listener to pass information about the event through to the moveEnemy function, in the form of an instance (event) of the class TimerEvent. We don’t need to know any of that information, however, so we won’t be referring to it again. Also, there’s void again.
All we have to do now is use this new function to tell the enemy to move. Remember the *moveDownABit* function we put inside Enemy earlier? Time to make use of it:
		public function moveEnemy(event:TimerEvent):void {
			enemy.moveDownABit();
		}
So this tells the enemy instance to run its moveDownABit function. Save everything, and run the game (Control > Test Movie, remember).
Nothing happens.
We have to tell the gameTimer to start! Go ahead and edit your game’s constructor as below (line 16):
		public function AvoiderGame() {
			enemy=new Enemy();
			addChild(enemy);

			gameTimer = new Timer(25);
			gameTimer.addEventListener(TimerEvent.TIMER, moveEnemy);


			gameTimer.start();
		}
Save everything, and run it again. Success! The enemy is moving downscreen, at a healthy rate of 3 pixels per 25ms (or 120 pixels/second).
Now we need to add some amount of interactivity, otherwise this is just a movie and not a game.
Get your Head in the Game
First we have to make our player’s avatar. In your FLA file, create a new symbol, of type Movie Clip, called Avatar. (Check out the section above on creating the enemy if you can’t remember how to do this.) Draw whatever you want to represent the player. Frozen Haddock defied convention again by picking a skull for his protagonist. I want to get in on some of this action.

Don’t feel bad if your drawings aren’t anywhere near as good as mine. After all, I do have a GCSE in graphic design.
Alright, so once you’ve made your Avatar, centred the registration point, got out of editing mode, and saved the FLA, what’s next? You will probably not be surprised to hear that we’re going to create a new AS file for the Avatar. Save it as Avatar.as in the Classes folder, and start editing it:
package {
	import flash.display.MovieClip;
	public class Avatar extends MovieClip {
		public function Avatar() {
		}
	}
}
Same old story. Go ahead and link it to the Avatar in the Library.
What is our avatar going to do? At the minute, it’s just going to follow the mouse around the screen – effectively, it’ll be a mouse pointer. We can actually control the avatar’s position from within the AvoiderGame class, so we don’t need to add any more code to the Avatar class right now.
Switch to editing the AvoiderGame.as file, and let’s add an instance of the Avatar class to the game. I’ll put in all the code at once, this time, since it’s pretty much the same as when we did it for the enemy. (The following is in the AvoiderGame.as file) (New code: lines 8, 15, & 16):
	public class AvoiderGame extends MovieClip {
		public var enemy:Enemy;
		public var avatar:Avatar;
		public var gameTimer:Timer;

		public function AvoiderGame() {
			enemy=new Enemy();
			addChild(enemy);

			avatar=new Avatar();
			addChild(avatar);

			gameTimer = new Timer(25);
			gameTimer.addEventListener(TimerEvent.TIMER, moveEnemy);
			gameTimer.start();
		}

		public function moveEnemy(event:TimerEvent):void {
			enemy.moveDownABit();
		}
	}
If you run the game now, you’ll see that the avatar instance appears in the top left corner of the screen – i.e., at position (0,0). We want it to start off wherever the mouse cursor is. Flash has two properties we can use for this: mouseX, which gives the x-coordinate of the mouse cursor, and mouseY, whose functionality you can probably guess. As mentioned above, anything that extends a MovieClip will have an x and a y property that we can edit. So (lines 17 – 18):
		public function AvoiderGame() {
			enemy=new Enemy();
			addChild(enemy);

			avatar=new Avatar();
			addChild(avatar);
			avatar.x=mouseX;
			avatar.y=mouseY;

			gameTimer = new Timer(25);
			gameTimer.addEventListener(TimerEvent.TIMER, moveEnemy);
			gameTimer.start();
		}
If you run this, the avatar will indeed appear at the mouse cursor (this is easier to see if you use the keyboard shortcut for Test Movie which is Ctrl-Enter on Windows and Command-Enter on Macs). Since we use the gameTimer to alter the enemy’s position every split-second, let’s also use it for the avatar’s position (lines 27 – 28):
		public function moveEnemy(event:TimerEvent):void {
			enemy.moveDownABit();
			avatar.x=mouseX;
			avatar.y=mouseY;
		}
Oh, wait, moveEnemy isn’t really a suitable name for the function now. How about moveEnemyAndAvatar?
		public function moveEnemyAndAvatar(event:TimerEvent):void {
			enemy.moveDownABit();
			avatar.x=mouseX;
			avatar.y=mouseY;
		}
We’ll have to update the gameTimer’s event listener to point to this function’s with it’s new name, or it’ll get confused:
gameTimer.addEventListener(TimerEvent.TIMER, moveEnemyAndAvatar);
Save and run the game, and bask in the glory of your new, skull-shaped mouse cursor!

Putting the “Avoid” in “Avoider Game”
You might have noticed that if you do happen to run your avatar into the enemy… absolutely nothing happens. This isn’t very good for an avoider game, so let’s correct that.
How will we know if the avatar has hit the enemy? MovieClips have a built-in function called hitTestObject which detects whether the MovieClip is touching another specified MovieClip. Naturally our Avatar and Enemy classes have this as well. Since the objects only move when the gameTimer goes off, we should check for a collision in the gameTimer’s event listener’s connected function (lines 30-32):
		public function moveEnemyAndAvatar(event:TimerEvent):void {
			enemy.moveDownABit();
			avatar.x=mouseX;
			avatar.y=mouseY;

			if (avatar.hitTestObject(enemy)) {

			}
		}
avatar.hitTestObject(enemy): this will return a value of true if the avatar is touching the enemy
if: “if the statement between the next pair of parenthesis is true, then run the code between the next pair of curly brackets”
At the minute there’s nothing between the curly brackets, so nothing will happen upon a collision. Before we add anything there, we should really change the name of the moveEnemyAndAvatar function, since once again it is no longer accurate. I can see that we’ll be adding more and more to this function in future parts of this tutorial, so let’s not bother with a cumbersome name like moveEnemyAndAvatarAndAlsoCheckToSeeIfTheyHaveCollided. Instead, I’m going to define a new word:
Tick: every time the gameTimer goes off, that’ll be called a Tick from now on. Everything that needs to be updated or checked will occur once per Tick.
So now we can rename the function to onTick:
		public function onTick(event:TimerEvent):void {
			enemy.moveDownABit();
			avatar.x=mouseX;
			avatar.y=mouseY;

			if (avatar.hitTestObject(enemy)) {

			}
		}
Don’t forget to change the gameTimer’s event listener to point to the new name. We won’t need to alter it again after this.
Finally, let’s make the game actually do something when the enemy hits the avatar. Since I haven’t covered lives, we haven’t made a game over screen, and there’s no scoring system yet, I’ll take this as an opportunity to show you something.
You know how we had to start the gameTimer before anything happened? Well, add this to your onTick event (line 31):
		public function onTick(event:TimerEvent):void {
			enemy.moveDownABit();
			avatar.x=mouseX;
			avatar.y=mouseY;

			if (avatar.hitTestObject(enemy)) {
				gameTimer.stop();
			}
		}
Now save and run the game, and see what happens when you run into the enemy. Don’t worry, the game hasn’t crashed; we’re just no longer running any Tick code. Two things we can notice from this:
1. The collision detection is terrible
2. A pause feature is going to be very easy to implement later
Wrapping Up
I realise that what we’ve got so far is very crude, both in terms of code and gameplay. Now that we’ve got the basic framework down, future parts of the tutorial will be able to add more in less time. In the next part, we’ll be adding multiple enemies, and after that we’ll be adding a clock, and a game over screen, and lives, and a scoring system, and, well, everything that Frozen Haddock’s series has.
This is there result of this tutorial (you may need to reload the page to see the enemy in action)
And this is the source code. Download it, enjoy it and follow the updates on Michael Williams‘s blog.