

Unity hook like the one seen on iOS Mikey Hooks game
Talking about Mikey Hooks game, C#, Game development and Unity3D.
Learn cross platform HTML5 game development
Check my Gumroad page for commented source code, games and books.
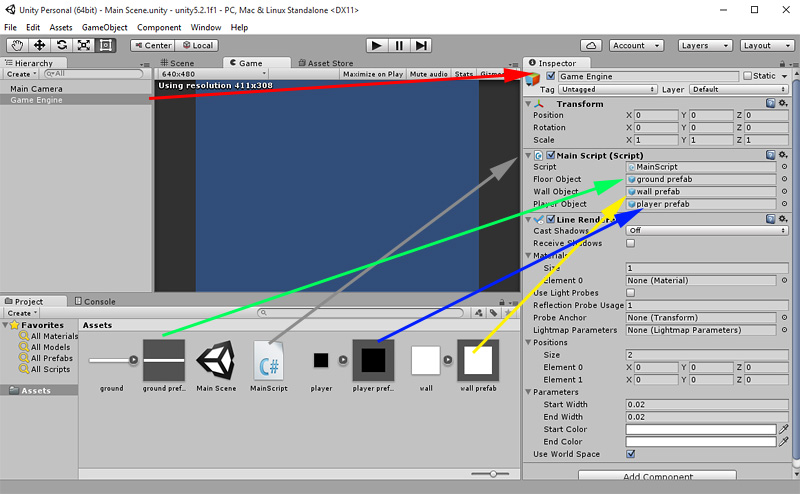
Main Camera and a Game Engine empty object, where we are going to embed the main script. The game is also set to run at 640×480. If you have troubles to set up the camera, create game objects, change resolution or create and expand game prefabs, like the one we are going to see in a moment, there’s a detailed tutorial here.
Now, let’s have a look at Assets window:
* mainScene: the main scene, save it before you close the project
* MainScript: the main script, which will be added to Game Engine
* ground: the ground PNG image
* player: the player PNG image
* wall: the wall PNG image
* ground prefab: the prefab of the ground, containing the ground image, Rigidbody 2D component with Is Kinematic checked and Box Collider 2D component with default attributes
* wall prefab: the prefab of the wall, containing the wall image, Rigidbody 2D component with Is Kinematic checked and Box Collider 2D component with default attributes. Alto it’s tagged as “Wall”. Refer to this post if you aren’t familiar with Unity Tag feature.
* player prefab: the prefab of the player, containing the player image, Rigidbody 2D component and Box Collider 2D component with default attributes.
With this in mind, have a look at what we are going to build – remember it probably won’t work on Chrome:
You should know how to play: click and hold on a wall to fire the hook, release to destroy the hook.
And this is the commented source code of MainScript:
using UnityEngine;
using System.Collections;
public class MainScript : MonoBehaviour {
// the floor/ground prefab
public GameObject floorObject;
// the wall prefab. Player will be able to fire the hook on walls
public GameObject wallObject;
// the player prefab
public GameObject playerObject;
// thePlayer variable will be playerObject instance during the game
private GameObject thePlayer;
// the distance joint we are going to build on the fly during the game
private DistanceJoint2D hookJoint;
// there is no debug draw mode to show distance joints so I am going to use a LineRenderer to draw it manually
private LineRenderer rope;
// Use this for initialization
void Start () {
// initializing rope’s LineRenderer
rope = GetComponent<LineRenderer>();
// placing the floor object on the stage
Instantiate(floorObject);
// adjusting floor position
floorObject.transform.position = new Vector2(0f, -2.2f);
// adding the player to stage
thePlayer = Instantiate(playerObject);
// adjusting player position
thePlayer.transform.position = new Vector2(0f, -1.8f);
// generating 8 random walls
for (int i = 0; i < 8; i++) {
GameObject randomWall = Instantiate(wallObject);
float screenWidth = Screen.width / 200;
float screenHeight = Screen.height / 200;
float randomX = Random.Range(-screenWidth, screenWidth);
float randomY = Random.Range(-screenHeight / 2, screenHeight);
randomWall.transform.position = new Vector2(randomX, randomY);
}
}
// Update is called once per frame
void Update () {
// if mouse is pressed…
if (Input.GetButtonDown (“Fire1”)) {
// this is how I fire a ray cast to check for objects under the mouse
RaycastHit2D hit = Physics2D.Raycast (Camera.main.ScreenToWorldPoint (Input.mousePosition), Vector2.zero);
// if there’s a collision and the colliding game object has been tagged as “Wall”…
if (hit.collider != null && hit.collider.gameObject.CompareTag(“Wall”)) {
// adding a distance joint to the player
hookJoint = thePlayer.AddComponent<DistanceJoint2D>() as DistanceJoint2D;
// connecting the distance joint to the object under the mouse
hookJoint.connectedBody = hit.collider.GetComponent<Rigidbody2D>();
// calculating the distance between the player and the object under the mouse
float distance = Vector2.Distance(hit.transform.position, thePlayer.transform.position);
// setting distance joint distance accordingly
hookJoint.distance = distance;
// objects connected by the joint can collide
hookJoint.enableCollision = true;
// this LineRenderer has two points, marked as “0” and “1”. Setting “0” points to wall position
rope.SetPosition(0, hit.transform.position);
}
}
// if mouse is released…
if (Input.GetButtonUp(“Fire1”)) {
// if there is a distance joint…
if (hookJoint) {
// destroying the joint
Destroy(hookJoint);
// setting hookJoint variable to null
hookJoint = null;
// setting “0” and “1” points in the same position will cause the rope not to render
rope.SetPosition(0, new Vector3(0, 0, 0));
rope.SetPosition(1, new Vector3(0, 0, 0));
}
}
// if there is a distance joint…
if (hookJoint) {
// shorten its distance by 0.05%
hookJoint.distance = hookJoint.distance * 0.995f;
// setting “1” points of rope LineRenderer to player position, causing the rope to be displayed
rope.SetPosition(1, thePlayer.transform.position);
}
}
}
As you can see, it’s very easy to create a hook with Unity. As it was with other languages and frameworks.
Give me feedback and Download the source code. Never miss an update! Subscribe, and I will bother you by email only when a new game or full source code comes out.