Flare3D Vs Away3D in the creation of a simple game
If you followed the blog during the latest days, you probably know about the Sokoban prototype made with Flare3D and Away3D.
I was making the prototype with Alternativa3D and Papervision3D too, but I dropped both engines because they can’t compete against Flare3D and Away3D.
It’s time to compare the engines, to see which works better, for the purpose of making a simple game. If you are looking for benchmarks or killer applications, then this is not the post for you. The web is full of such benchmarks.
I am comparing the engines using different parameters, such as ease of use and learning curve.
This comparison has been made after only a couple of hours spent messing with the engines, so take it as a beginners’ guide to choose the best Flash 3D engine.
INSTALLATION
Since the first thing you have to do is install the library, let’s start from the beginning.
Flare3D: you need to register to download the swc file.
Away3D: just go to download section and get all libraries.
What’s better: I prefer Away3D because I think dealing with as files is way better than doing it with swc files. The reason is simple: if I have doubts about a method, I can browse the source code. Also, as files encourage users to improve the library, adding their own classes.
DOCUMENTATION
Once downloaded the library, it’s time to look at the documentation to start our first project.
Flare3D: the official tutorials explained everything I needed to create the entire prototype. I did not have to look elsewhere.
Away3D: the tutorials section mainly hosts links to external tutorials, most of them outdated. As an example, some tutorials refer to Number3D class which has been removed from the latest Away3D version, which now uses Vector3D. Also, the examples aren’t much more than a snippet of code.
What’s better: Flare3D. You can learn a lot from the official tutorials.
SHADED MATERIALS CREATION
To play with basic light effects, we need to create some shaded material
Flare3D: these are the materials I used:
private var floorMaterial:ShadedColorMaterial=new ShadedColorMaterial("",0x000000,0x888888);
private var wallMaterial:ShadedColorMaterial=new ShadedColorMaterial("",0x000000,0x880088);
private var goalMaterial:ShadedColorMaterial=new ShadedColorMaterial("",0x000000,0x00ff00);
private var crateMaterial:ShadedColorMaterial=new ShadedColorMaterial("",0x000000,0xff0000);
private var playerMaterial:ShadedColorMaterial=new ShadedColorMaterial("",0x000000,0x0000ff);
very easy as you can see, the first parameter is the name (which you won’t use), the second the ambient color and the third the diffusion color
Away3D: these are the same materials:
private var floorMaterial:ShadingColorMaterial=new ShadingColorMaterial(0x888888);
private var wallMaterial:ShadingColorMaterial=new ShadingColorMaterial(0x880088);
private var goalMaterial:ShadingColorMaterial=new ShadingColorMaterial(0x00ff00);
private var crateMaterial:ShadingColorMaterial=new ShadingColorMaterial(0xff0000);
private var playerMaterial:ShadingColorMaterial=new ShadingColorMaterial(0x0000ff);
it works in the same way, but you can define just the material color if you want.
What’s better: both engines are simple
SCENE SETUP
Time to prepare the scene to render the game
Flare3D: look how do I create a scene:
scene=new Viewer3D(this);
Away3D: things are a little more difficult here:
view=new View3D({x:320,y:240});
addChild(view);
theCamera= new SpringCam();
view.camera=theCamera;
var light:DirectionalLight3D = new DirectionalLight3D();
light.direction=new Vector3D(CUBESIZE*10,- CUBESIZE*6,CUBESIZE*4);
view.scene.addLight(light);
I had to add the scene, a light (or your shaded material will be rendered completely black, since there isn’t a default light) and a spring camera. I needed the spring camera to create the 3rd person camera which follows the player. The lack of updated tutorials about the spring camera made me go through a lot of tries before I got everything working.
What’s better: I loved the simplicity of Flare3D.
LEVEL CREATION
Once the scene has been created, I added the cubes to build the level.
Flare3D: this is how I added a wall:
cube=new Cube("",CUBESIZE,CUBESIZE,CUBESIZE,1,wallMaterial);
cube.setPosition(CUBESIZE*j,CUBESIZE*3/4,CUBESIZE*i);
scene.addChild(cube);
You can set the position, the material and the size of the cube in a few seconds.
Away3D: and this is how I did with Away3D:
cube=new Cube({material:wallMaterial,depth:CUBESIZE,width:CUBESIZE,height:CUBESIZE,x:CUBESIZE*i,y:CUBESIZE*3/4,z:CUBESIZE*j});
view.scene.addChild(cube);
Position, size and material of the cube have been created in seconds.
Both engines place the pivot point of the cube in its center.
What’s better: Both engines are easy to use.
PLAYER INPUT
Although keyboard input can be managed by both engines with KeyboardEvent.KEY_DOWN, Flare3D provides Input3D class to handle (also) keyboard events. To check for UP arrow key you just need to write:
if (Input3D.keyDown(Input3D.UP)) { }
This is useful although no critical, but just for your information Flare3D does it.
CUBE ROTATION
The player can rotate clockwise and counterclockwise by 90 degrees.
Flare3D: this is how you rotate a cube around its Y axis:
player.rotateY(playerRotation);
being a method, you have to call another method (getRotation().y) to get the rotation.
Away3D: things are a bit simpler with Away3D:
player.rotationY+=playerRotation;
the same property can be used to set and get player rotation.
What’s better: there’s not that much difference, but I preferred Away3D‘s property approach.
CUBE MOVEMENT
One thing a 3D engine must do is moving an object in a three dimensional environment.
Flare3D: to move the cube according to its angle, I used this code:
switch (playerAngle) {
	case 0 :
		movingCrate.translateX(playerMovement);
		break;
	case 90 :
		movingCrate.translateZ(-playerMovement);
		break;
	case 180 :
		movingCrate.translateX(-playerMovement);
		break;
	case 270 :
		movingCrate.translateZ(playerMovement);
		break;
}
the cube is translates along an axis according to the angle it’s facing.
Away3D: basically the concept is the same:
switch (playerAngle) {
	case 0 :
		movingCrate.moveForward(playerMovement);
		break;
	case 90 :
		movingCrate.moveRight(playerMovement);
		break;
	case 180 :
		movingCrate.moveBackward(playerMovement);
		break;
	case 270 :
		movingCrate.moveLeft(playerMovement);
		break;
}
but moveLeft method is more intuitive than translateZ method.
What’s better: again, not that much difference, but I prefer Away3D‘s way to move objects.
CAMERA MANAGEMENT
The last thing we need to do is making the camera follow the player.
Flare3D: really, really awesome:
Pivot3DUtils.setPositionWithReference(scene.camera,CUBESIZE*3,CUBESIZE*6,0,player,0.1);
Pivot3DUtils.lookAtWithReference(scene.camera,-CUBESIZE*2,-CUBESIZE*3,0,player);
… and that’s it.
Away3D: it wasn’t easy, due to the lack of documentation, although in the end I have to say it’s quite intuitive:
theCamera.target=player;
theCamera.positionOffset=new Vector3D(0,CUBESIZE*8,CUBESIZE*4);
theCamera.lookOffset=new Vector3D(0,0,- CUBESIZE);
theCamera.damping=20;
theCamera.view;
the spring camera is very powerful, but you will need practice and patience to make it work properly.
What’s better: come on, I just need a fixed 3rd person camera: Flare3D is better.
VISUAL GLITCHES
Both engines have visual glitches, which I hope I will be able to remove somehow.
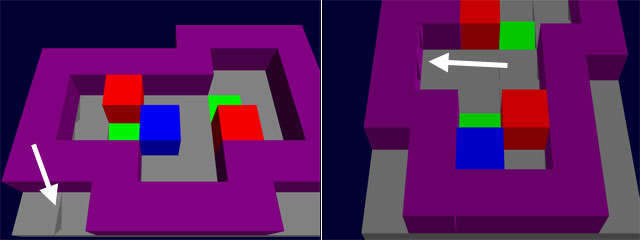
On the left, Flare3D, on the right Away3D
FINAL CONSIDERATIONS
At this very beginning of the development, I would recommend Flare3D because of its documentation and its ease of use.
Obviously more has to come, such as textures and light. Stay tuned.