

Tutorial: your first Unity2D project – a Circle Chain prototype
Talking about Circle Chain game, C#, Game development and Unity3D.
In my opinion, for the upcoming 2015 there are three tools you need to master if you want to produce cool games: Phaser, Cocos2D and Unity 2D which is basically Unity 3D this time with native 2D support.
As you can see I am publishing a lot of Phaser tutorials, there’s an upcoming Cocos2D-JS book so I am also going to start doing some stuff with Unity.
Let me show you how to create a 2D project based on the simple Circle Chain prototype, which has been already ported in Unity with a fake 2D environment.
This time we’ll be using real 2D. Anyway, the engine has also been ported to AS3, Game Maker, Construct2 HTML5, Corona SDK, Gideros Studio, Stencyl, Starling, CreateJS, Cocos2D HTML5.
Let’s start. First, when you create a new Unity project, keep in mind you have to select “2D”

Then you have to select the resolution: I am using 500×500 because it’s the size of the original game.

In the main camera inspector – click the camera to open it – be sure you have ortographic projection and size = half the height of your project divided by 100. This is to match Unity unit of measurement with pixels.

Once you set up the project, simply drag and drop an image in your project tab to import it in the project.

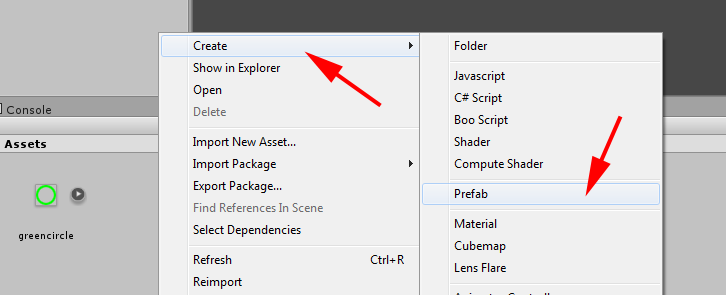
Now we need to turn the circle asset in a prefab. Think about a prefab as a class. So, first we create a prefab with right mouse click -> Create -> Prefab.
And here it is our empty prefab.

Now, to turn the green circle into a prefab, first drag it into hierarchy tab, then drag it into the prefab and finally remove the green circle from the hierarchy tab

And for those of you who hate dragging and dropping stuff here and there, now it come the interesting part: coding! Create a C# script and name it placingCircle

Then double click on the script and a text editor called MonoDevelop will open

Time to code! This script will randomly place then circles:
using UnityEngine;
using System.Collections;

public class placingCircles : MonoBehaviour {

	public GameObject circleInstance = null;
	public int greenCircles = 10;

	// Use this for initialization
	void Start () {
		for(int i = 0; i < greenCircles; i ++){
			GameObject greenCircle = Instantiate(circleInstance) as GameObject;
			greenCircle.transform.position = new Vector3(Random.Range(-2.3F, 2.3F),Random.Range(-2.3F, 2.3F), 0);
		}
	}

	// Update is called once per frame
	void Update () {

	}
}
Almost every line of this script belongs to the default script Unity created, so we are going to see what changes:
Line 6: declaring a new GameObject variable called circleInstance.
Line 7: how many green circles we want to create.
Line 11: looping through all circles we want to create
Line 12: here is how we create a game object and add it to the stage
Line 13: and this is how we set its position in the 3D – actually 2D – environment. Notice how random numbers are generated with Random.Range and how the range is set between -2.3 and 2.3 to randomly placed position between 20 and 480, because the origin (0,0) is in the perfect center of the scene.
Once you saved the script, assign it to the main camera by dragging it into the hierarchy camera item.
You will also see your global variables in the inspector, drag the circle prefab in the circle instance and you’re done.

This will place the circles on the scene, now it’s time to move them, so add another C# script called circleBehavior:
using UnityEngine;
using System.Collections;

public class circleBehavior : MonoBehaviour {

	public float speed = 3;
	private float xSpeed;
	private float ySpeed;

	// Use this for initialization
	void Start () {
		float angle = Random.Range(0, 2 * Mathf.PI);
		xSpeed = speed * Mathf.Cos(angle) / 100;
		ySpeed = speed * Mathf.Sin(angle) / 100;
	}

	// Update is called once per frame
	void Update () {
		transform.Translate(xSpeed, ySpeed, 0);
		if(transform.position.x < -2.4){
			transform.position = new Vector3(-2.4F, transform.position.y, 0);
			xSpeed *= -1;
		}
		if(transform.position.x > 2.4){
			transform.position = new Vector3(2.4F, transform.position.y, 0);
			xSpeed *= -1;
		}
		if(transform.position.y < -2.4){
			transform.position = new Vector3(transform.position.x, -2.4F, 0);
			ySpeed *= -1;
		}
		if(transform.position.y > 2.4){
			transform.position = new Vector3(transform.position.x, 2.4F, 0);
			ySpeed *= -1;
		}
	}
}
This is the classic “keep moving at a random angle until you hit the edge of the scene, then bounce” script, so I would only point you on Translate method (line 19) which moves a game object for a given amount of units.
And this is the final result:
Next time we’ll add interaction, meanwhile download the entire project.
Never miss an update! Subscribe, and I will bother you by email only when a new game or full source code comes out.