

“Don’t Touch the Spikes” game prototype built with BuildBox
Talking about Don't touch the spikes game, 3D, Game development and Javascript.
Last week I blogged about BuildBox adding a free subscription plan, and how easy is to build a game with no code.
Since I hate the #nocode tag, I am going to show you how to build a game like “Don’t Touch the Spikes” which I already coded with Phaser, this time using BuildBox and yes, a bit of code.
Since BuildBox does not feature HTML5 export, here is an animation of what we are going to build:

We have a lot of features in this prototype: a moving 3D camera, physics, input management, particles, collision detection and a completely random game, which is the most difficult part to get in BuildBox, according to what people say on the web.
Follow me in the creation of the prototype:
First, create a new game. Say “no” to built-in templates and learn to build your stuff from scratch. It’s the best way to learn.

For the same reason, we say “no” to wizards, because we are wizards ourselves, aren’t we? So let’s start with an empty project.

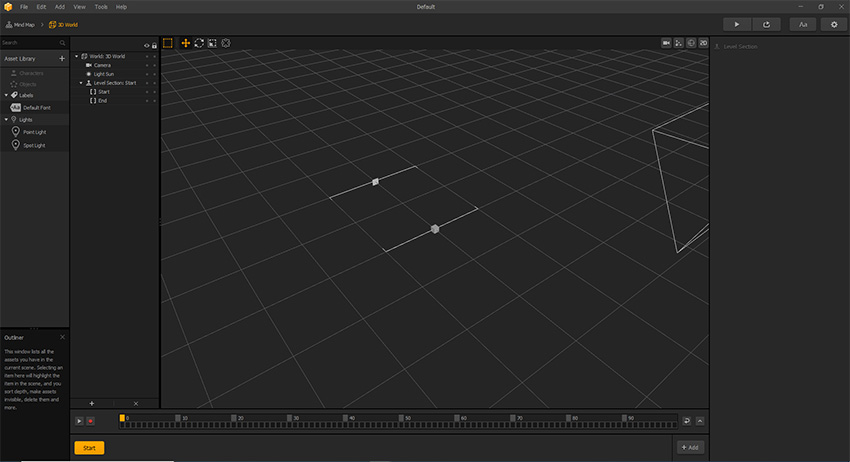
This is the “Mind Map”, the place where you can organize the flow of your game. The default game takes place in a 2D world.

We are going to create a 3D game so we delete the 2D world by selecting it and press “Canc”, then by dragging a 3D World in the Mind Map

Now let’s connect the two “Load” nodes and we are ready to build our 3D game.

This is our empty scene. This is where we are going to place assets.
Click on “Asset Library”, select a Cube then click on “Add to Library”

You will find it in your Asset Library bar, and if you select it you can change its name to “Wall”, as well as check “Physics” checkbox and set body type to “Static”.

Following the same concept, create two more physics static cubes which you will call “Left Wall” and “Right Wall”

The game also features spikes, which we can create using a cone. Add a Cone to Asset Library

The cone will be called “Spike”, will be a physics Kinematic body and we can also assign it a color by changing its “3D Model” settings. This way we’ll have a red cone

Now it’s time to add the player: a sphere.

The sphere is a dynamic physics body.

As you can see, the sphere is listed among the objects, but we want it to be a character, so let’s drag it up in “Characters” tab.

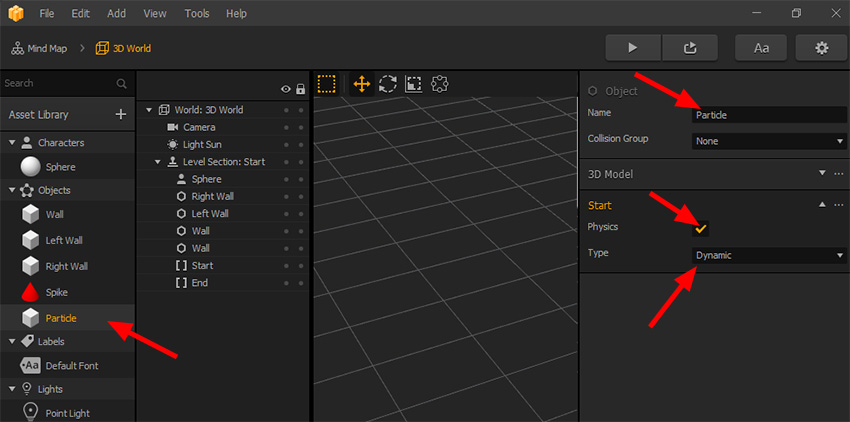
The last actor to add to the game is a cube which we’ll use as a particle.

Call it “Particle” and set it as a dynamic physics body.
You can drag and drop assets from the Asset Library directly to the stage. Try to do it with a wall:

As long as your asset is selected, you can change its position, rotation and scale along the three axes. Give position (0, 22, 0), rotation (0, 0, 0) and scale (14, 2, 2) and your cube will probably disappear.
This is because it’s out of camera view

We can select the camera view with the proper button in the top right side of the window

Then we can select the camera and sets its properties just as if it were an asset: let’s try position (0, 0, 50), rotation all set to zero and size all set to 1:

Yeah! Now the wall is visible. Let’ add the bottom wall. You can drag and drop assets in camera view too:

Place the new wall at (0, -22, 0) and give it a scale of (14, 2, 2), and the bottom wall is placed.

Following the same concept, let’s add left wall at (-12, 0, 0) with scale (2, 20, 2).

And the right wall at (12, 0, 0) with the same scale.

Now the game field is completely built! Now, let’s add the player by dragging the sphere and giving it a position (-6, 1, 0).

And we are done with dragging and dropping assets. From now on, we’ll work on the sphere itself. Double click it on the Asset Library and you will open the Node Map. This is where you can arrange your nodes to crate an action for your character or object.

At the moment we only have the 3D model, but from the left accordion panel we can choose Controls -> Touch to drag and drop it on the Node Map.

Then, enable the Touch node by linking its “Enabled” label with the “Created” label of the Start node.

The game is also responsive to collisions, so drag three “If Collide” nodes from the “Actions” tab.

Nodes can be customized by selecting them and editing their properties in the panel on the right. Name the node “Left Wall Collision” and select “Left Wall” from “Affected Asset”. Then following the same concept create “Right Wall Collision” for “Right Wall” asset and “Spike Collision” for “Spike” asset.

Let’s link the nodes exactly as we did before with “Touch” node.

We want the ball to explode when the player hits a spike, so let’s add “Debris Explosion” to Node Map

Leave all default options, just select the “Particle” asset from “Asset” property. And link “Debris Explosion” with “Collide” label in “Spike Collision” node.

We also want the camera to rotate a bit following the sphere, and we can do it with “Camera Rotation Animation” node.

“Left Wall Collision” will be linked to a “Camera Rotation Animation” node whose target delta is (0, -5, 0) in 0.2 seconds and InCube easing function.

Same thing for “RightWall Collision” but the other node will have a target delta (0, 5, 0).

Now, the king of the nodes: the Script Node.

By clicking on it you can add labels, which actually are signal listeners, and we will create “Jump”, “Left Wall Collision” and “Right Wall Collision”. Also have a look at the default code at the right of the screen: it’s JavaScript!

You can also add custom attributes to a Script Node by selecting them from “Add Attribute” button.

We are going to add three custom attributes: “Ball Speed”, “Jump Force” and “Max Spikes”, respectively with 15, 35, and 5 default values. Changing these values will affect gameplay.

And now it’s time to link the proper signals with the listeners to make the game react to touch, left wall collision and right wall collision.

Finally, the fun part: the script! Here it is the commented JavaScript:
// global variables
let speed;
let jumpForce;
let maxSpikes;
let direction = 1;
let leftSpikeArray = [];
let rightSpikeArray = [];

// init function is executed only once, and gets custom attributes
function init(){

	// here is how we get a custom attribute
	speed = this.attribute("Ball Speed");
	jumpForce = this.attribute("Jump Force");
	maxSpikes = this.attribute("Max Spikes");
}

// start function is executed when the scene starts
function start(){

	// set linear velocity on x, y and z axes
	this.entity().physics().setLinearVelocity(speed, 0, 0);
	placeTopDownSpikes(this.scene());
	placeLeftRightSpikes(this.scene());
}

// function executed at each frame
function update(dt){

	// we get and set velocity to nullify friction
	let currentBallVelocity = this.entity().physics().linearVelocity();
	this.entity().physics().setLinearVelocity(speed * direction, currentBallVelocity.y, 0);

	// we get and set position to avoid movements on z axis
	let currentBallPosition = this.entity().position();
	this.entity().setPosition(currentBallPosition.x, currentBallPosition.y, 0);
}


// executed each time a signal is dispatched
function signal(name, value){

	// jump signal
	if(name == "Jump" && value){

		// change ball velocity
		this.entity().physics().setLinearVelocity(speed, jumpForce, 0);
	}

	// left wall collision signal
	if(name == "Left Wall Collision" && value){

		// change direction
		direction = 1;

		// reset spikes position
		resetSpikes();

		// place random spikes on the right wall
		randomSpikes(rightSpikeArray, 9);
	}

	// right wall collision signal
	if(name == "Right Wall Collision" && value){

		// change direction
		direction = -1;

		// reset spikes position
		resetSpikes();

		// place random spikes on the left wall
		randomSpikes(leftSpikeArray, -9);
	}
}

// function to place top and down spikes
function placeTopDownSpikes(scene){
	for(let i = 0; i < 6; i++){

		// this is how we create an entity on the fly
		let lowerSpike = scene.create("Spike");

		// this is how we set a position
		lowerSpike.setPosition(-7.5 + i * 3, -19, 0);
		let upperSpike = scene.create("Spike");
		upperSpike.setPosition(-7.5 + i * 3, 19, 0);

		// this is how we set a rotation
		upperSpike.setRotation(0, 0, 180);
	}
}

// function to place left and right spikes then place in respective arrays
function placeLeftRightSpikes(scene){
	for(let i = 0; i < 12; i++){
		let rightSpike = scene.create("Spike");
		rightSpike.setPosition(12, -16.5 + i * 3, 0);
		rightSpike.setRotation(0, 0, -90);
		rightSpikeArray.push(rightSpike)
		let leftSPike = scene.create("Spike");
		leftSPike.setPosition(-12, -16.5 + i * 3, 0);
		leftSPike.setRotation(0, 0, 90);
		leftSpikeArray.push(leftSPike)
	}
}

// function to make all spikes disappear inside the wall
function resetSpikes(){
	for(let i = 0; i < rightSpikeArray.length; i++){
  		let spike = rightSpikeArray[i];
  		let spikePosition = spike.position();
  		spike.setPosition(12, spikePosition.y, spikePosition.z);
  	}
  	for(let i = 0; i < leftSpikeArray.length; i++){
  		let spike = leftSpikeArray[i];
  		let spikePosition = spike.position();
  		spike.setPosition(-12, spikePosition.y, spikePosition.z);
	}
}

// function to make some random spiles to appear
function randomSpikes(array, posX){
	for(let i = 0; i < maxSpikes; i++){
		let n = Math.floor(Math.random() * array.length);
		let spike = array[n];
		let spikePosition = spike.position();
		spike.setPosition(posX, spikePosition.y, spikePosition.z);
	}
}
And this is how I built a 3D version of “Don’t Touch the Spikes” with BiuldBox. Next time I will add a star to collect to earn points, meanwhile download the full project. Do you like BuildBox?
Never miss an update! Subscribe, and I will bother you by email only when a new game or full source code comes out.